- For Educational Purposes Only: This content is intended for educational reference and should not be used for clinical decision-making.
- Not a Substitute for Professional Judgment: Always consult your local protocols, institutional guidelines, and supervising physicians.
- Accuracy Not Guaranteed: While all content has been prepared to the best of my knowledge and ability, errors or omissions may exist.
- Verify Before Acting: Users are responsible for verifying information through authoritative sources before any clinical application.
Chest Tubes (Tube Thoracostomy)
Comprehensive Reference for Pleural Space Drainage
Critical Procedure- Moderate/large pneumothorax
- Hemothorax / hemopneumothorax
- Empyema, malignant effusions
- Post-op thoracic surgery
- Size: Air only: 8–14 Fr pigtail; Trauma: 28–36 Fr
- Site: Safe triangle (4th–5th ICS, mid-axillary line)
- Suction: Standard –20 cm H₂O
- Vascular / lung / abdominal organ injury
- Tension physiology if tube obstructed
- Re-expansion pulmonary edema (REPE)
- Infection / empyema
What is a Chest Tube?
A chest tube (also called tube thoracostomy, intercostal drain, or thoracic catheter) is a flexible, fenestrated tube inserted through the chest wall into the pleural space to:
- Remove air or fluid
- Re-establish negative intrathoracic pressure
- Allow lung re-expansion and improved ventilation/perfusion
The tube is connected to a one-way drainage system (usually a three-chamber water-seal or dry-suction system) that:
- Prevents air/fluid moving back into the pleural space
- Allows monitoring of volume, air leak, tidaling, and response over time
Indications
▶Pneumothorax
- Large or symptomatic primary spontaneous pneumothorax
- Any secondary pneumothorax (COPD, ILD, etc.) that is moderate/large, symptomatic, or under positive-pressure ventilation
- Traumatic pneumothorax, especially with hemothorax or mechanical ventilation
- Tension pneumothorax after emergent decompression (needle or finger thoracostomy) as definitive management
Hemothorax / Hemopneumothorax
- Traumatic hemothorax of any significant size
- Post-op thoracic bleed
- Diagnostic and therapeutic drainage to quantify rate of bleeding
Pleural Effusion
- Complicated parapneumonic effusion / empyema (pH < 7.2, LDH high, frank pus)
- Malignant effusion requiring ongoing drainage
- Symptomatic large effusion (especially ICU patients with respiratory compromise)
Post-surgical or Iatrogenic
- After thoracic, cardiac, upper abdominal surgery
- Persistent air leak or significant pneumothorax after procedures (lung biopsy, central line, barotrauma, etc.)
Contraindications & Cautions
▶Absolute (or Near-Absolute)
- No consent and non-emergent indication
- Chest wall infection at proposed insertion site → choose alternate site if possible
- Known diaphragmatic rupture with herniated abdominal contents at planned site (e.g., CT evidence)
Relative Contraindications
- Significant coagulopathy or thrombocytopenia (INR > 1.5, plt < 50k) – correct where possible but do not delay for unstable tension/hemothorax
- Dense pleural adhesions / previous thoracic surgery on that side – higher risk of injury/malposition
- Morbid obesity / distorted anatomy – use ultrasound where possible
- Very large, chronic effusion or long-standing pneumothorax → high REPE risk; consider staged drainage and lower suction initially
Anatomy & Landmarks
▶The "Safe Triangle"
The safe triangle is the preferred insertion site for chest tubes:
Borders:
- Anterior: Lateral border of pectoralis major
- Posterior: Anterior border of latissimus dorsi
- Inferior: Line at or just above 5th intercostal space (roughly nipple line in males)
- Superior: Axilla
Image Placeholder: Safe Triangle Anatomy
3D illustration showing pec major, lat dorsi, ribs, and safe zone for chest tube insertion
Suggested source: Medical anatomy atlas or institutional teaching materials
Key Anatomical Points
- Insert above the rib (superior border) to avoid the neurovascular bundle running along the inferior rib margin
- Aim the tube apically and posteriorly for air, basally and posteriorly for fluid
- In supine or semi-recumbent ICU patients, most air collects anteriorly/superiorly, fluid posteriorly/basally – but external access is still in the safe triangle; the trajectory differs
Equipment & Tube Selection
▶Tube Types
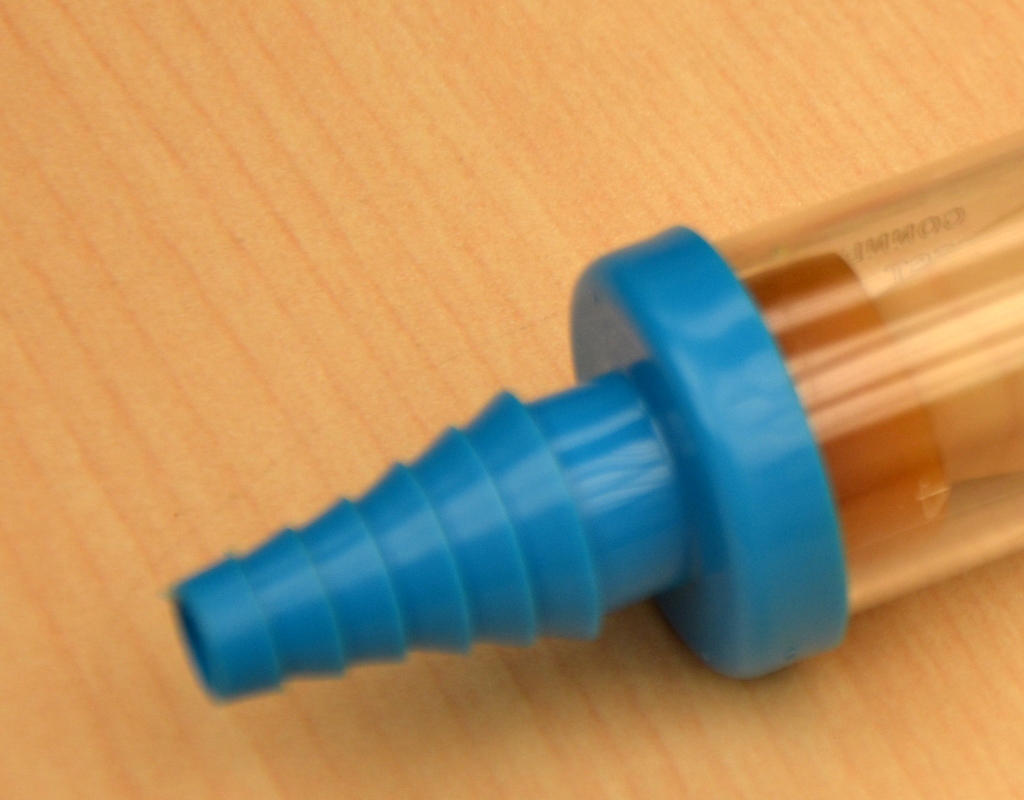
Traditional Large-Bore Chest Tube (20–36 Fr)
- Blunt dissection insertion
- Best for trauma hemothorax / hemopneumothorax where clot and high-volume blood are expected
Small-Bore / Pigtail Catheter (8–16 Fr)
- Seldinger/over-wire technique
- Very effective for simple pneumothorax or non-viscid effusions
- May be initial choice for malignant effusion/empyema per BTS 2023 guidance
Typical Size Choices (Adult)
| Indication | Recommended Size | Notes |
|---|---|---|
| Pneumothorax (non-trauma) | 8–14 Fr pigtail or 16–24 Fr tube | Smaller tubes often sufficient |
| Traumatic pneumothorax / hemothorax | 28–36 Fr (traditional) | Some centers use 24–28 Fr with similar outcomes |
| Empyema / viscous pleural fluid | 12–16 Fr small-bore or 20–24 Fr tube | Consider fibrinolytics if poorly draining |
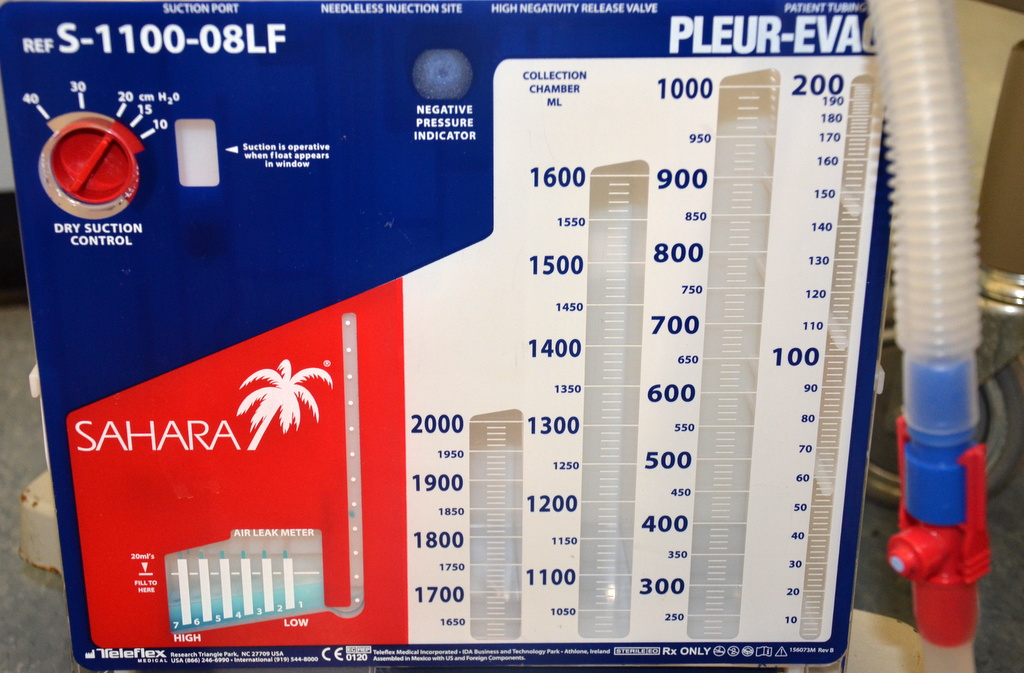
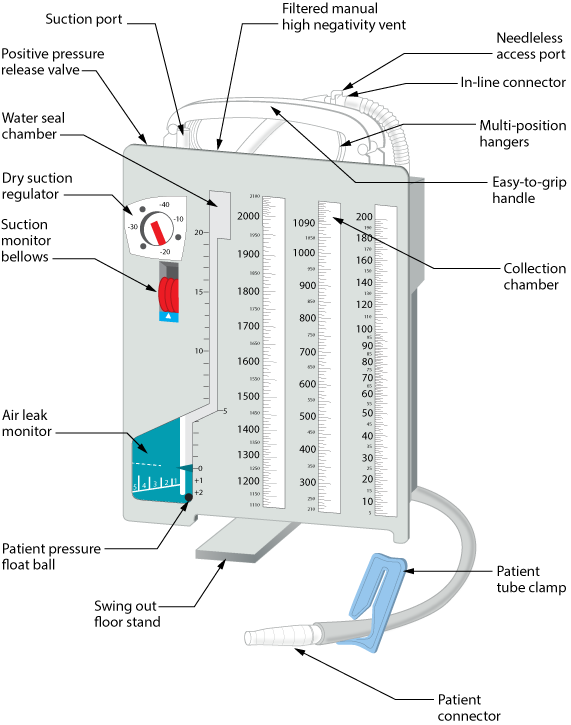
Drainage System
Modern disposable systems (e.g., Atrium Oasis/Ocean) consist of:
- Collection chamber: Measures output
- Water-seal chamber: One-way valve, tidaling, bubbling
- Suction chamber or dial: Sets negative pressure (e.g., –20 cm H₂O)
Pre-Procedure Preparation
▶1. Assessment & Imaging
Confirm indication and side:
- CXR, CT, or bedside ultrasound as available
Assess:
- Hemodynamics, oxygenation, ventilation
- Coagulation profile and platelet count (if time)
- Note prior thoracic surgery / radiation / chest deformity → higher malposition risk
2. Analgesia & Sedation
Local anesthesia infiltrated:
- Skin, subcutaneous tissue, periosteum of rib above, then intercostal muscles and pleura
- Lidocaine 1–2% (watch max dose)
Systemic analgesia:
- IV opioid (e.g., fentanyl, hydromorphone)
Sedation:
- Light–moderate sedation (e.g., midazolam, propofol, ketamine) titrated to patient and setting
- Mechanically ventilated patients may need deep sedation ± NMB to prevent bucking during insertion
3. Positioning
- Best: 45° semi-recumbent, arm on affected side abducted and placed behind head to open intercostal spaces
- Alternative: Lateral decubitus with affected side up (OR / certain ICU setups)
Image Placeholder: Patient Positioning
Diagram showing proper positioning with safe triangle marked and arm placement
4. Sterile Prep
Full maximal sterile barrier ideally:
- Cap, mask, sterile gown and gloves, full chest drape
- Wide chlorhexidine prep over anterior and lateral chest wall
Step-by-Step: Blunt-Dissection Insertion
▶(Non-crashing, adult, large-bore tube via safe triangle)
Step 1: Mark Site
4th–5th ICS in the mid- to anterior-axillary line within the safe triangle.
Step 2: Local Anesthetic
Raise a skin wheal, then infiltrate along planned tract down to pleura.
Step 3: Small Skin Incision
2–3 cm, parallel to the rib, centered over the superior edge of the rib below the intended ICS.
Step 4: Blunt Dissection
Use Kelly/Curved clamp:
- Spread through SC tissue, then over rib and through intercostal muscles
- Always keep tip on superior rib border
Step 5: Enter Pleural Space
- You'll feel a "give" as you push through parietal pleura
- Open clamp jaws and spread to enlarge the opening
Step 6: Finger Thoracostomy
Insert gloved finger into the space:
- Confirm lung position, lysis of local adhesions, absence of diaphragm/bowel right at site
- Ensure you feel free pleural space
Step 7: Guide Tube In
Grasp the fenestrated tube end with clamp; advance along your finger track into pleural space.
Direct:
- Posterior–apical for air
- Posterior–basal for fluid
Ensure all fenestrations are inside; check depth markings.
Step 8: Connect to Drainage System
- Immediately connect to primed water-seal system
- Remove clamps once the system is ready to avoid open pneumothorax
Step 9: Secure the Tube
- Heavy nonabsorbable suture (e.g., 0 or 1-0 silk/nylon)
- Use a stay suture that can also be used to close after removal
- Apply occlusive dressing (e.g., petroleum gauze + large Tegaderm)
Step 10: Confirm Placement
- Observe tidaling and expected bubbling
- Obtain post-insertion CXR as soon as feasible
Connecting & Managing the Drainage System
▶Initial Setup
Water Seal Chamber
- Fill to manufacturer's mark (usually 2 cm)
- Acts as one-way valve – expect tidaling with respiration
Suction
- Connect to wall suction and set regulator (commonly –20 cm H₂O)
- Remember: The suction dial, not wall vacuum number, determines negative pressure
Interpreting the System
Tidaling in Water Seal
- Present: Likely in pleural space and not fully expanded
- Absent: Consider kink, obstruction, lung fully expanded, or tube against lung
Bubbling
- Early, intermittent bubbling during expiration or coughing is normal in pneumothorax
- Continuous vigorous bubbling suggests significant air leak (from lung, tube connections, or system)
- Use "bubbling when clamped" method to localize leak (starting at patient and moving downstream)
Output
Document volume, character, and rate:
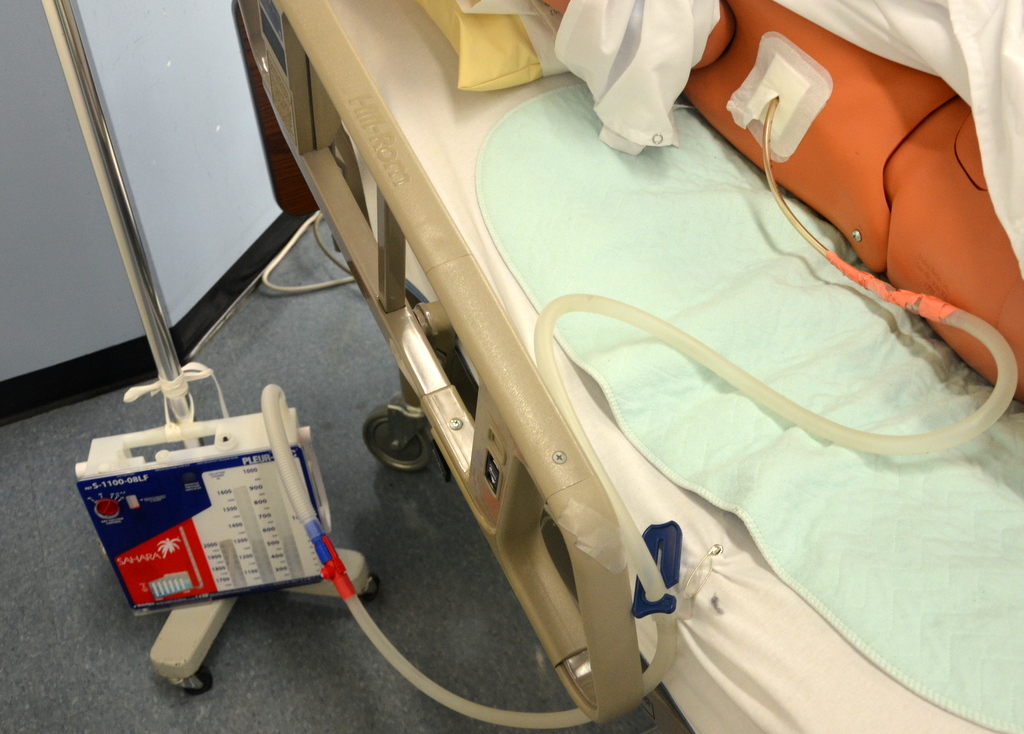
Routine Care & Maintenance
▶At the Bedside
Assessment Frequency
At least q1–2 hrs in ICU initially; more routine on stable floor patients.
Check:
- Insertion site & dressing (bleeding, air leak, infection, subQ air)
- Tube path (no kinks, dependent loops)
- Drainage system position (below chest, upright, not knocked over)
- Tidaling and bubbling pattern
- Total output and trend
Transport
- Keep system below chest level
- Do not clamp a chest tube with an active air leak unless absolutely necessary and you understand the risk of tension
- If temporary disconnection occurs, place the tube end in sterile water until reconnected
Troubleshooting (High-Yield)
| Problem | Considerations | Action |
|---|---|---|
| No tidaling | Tube kinked/occluded, lung fully expanded, or tube not in pleural space | Check tubing, reposition patient, consider imaging |
| Sudden cessation of drainage (hemothorax) | Clot / occlusion | Gentle milking per institutional policy; consider IR/VATS if retained hemothorax |
| Sudden large output of bright red blood | Active bleed | Reassess hemodynamics; notify trauma/thoracic surgery emergently |
| Extensive subcutaneous emphysema | Malfunction or malposition | Consider second tube or repositioning, check for persistent high air leak |
Removal: Criteria & Technique
▶When Is It Ready to Come Out?
Underlying issue resolved or improving:
- CXR or ultrasound shows re-expanded lung / minimal effusion
Output acceptable (institution-specific rules):
- Serous fluid <150–200 mL/24 hr
- No gross blood / pus
Air leak resolved:
- No bubbling at water seal during spontaneous breaths / cough for 12–24 hrs
Patient can be monitored for recurrent pneumothorax/effusion after removal.
Removal Steps
1. Explain & Pre-medicate
IV/PO analgesia; sometimes anxiolytic
2. Position
Head of bed at 30–45°, patient supine or semi-recumbent
3. Remove Dressing and Sutures
Keep stay suture ready if placed
4. Breath-Hold Strategy
Options:
- End-expiratory pause
- Valsalva maneuver (deep breath in and bear down)
Goal: Minimize air entrainment
5. Remove Tube
During breath hold, pull tube out in one smooth motion. Immediately occlude with occlusive dressing (e.g., petroleum gauze) and tie stay suture if present.
6. Post-Removal Monitoring
- Vitals, oxygenation, breath sounds
- Follow-up CXR based on local policy (often within 2–4 hrs or sooner if symptomatic)
Complications
▶Immediate / Early
Malposition
In subcutaneous tissue, fissure, mediastinum, abdomen, or lung parenchyma
Vascular Injury
Intercostal vessels, internal mammary, large thoracic vessels (rare but catastrophic)
Lung Laceration
Can worsen air leak, bleeding
Diaphragm / Abdominal Organ Injury
Liver, spleen, stomach, bowel – especially if tube inserted below recommended ICS or in very obese patients
Persistent Pneumothorax / Air Leak
Due to lung pathology (bronchopleural fistula), malposition, or tube dysfunction; persistent leak >48 hrs often prompts CT and/or surgical consultation
Re-expansion Pulmonary Edema (REPE)
What it is: Non-cardiogenic pulmonary edema in a lung that has re-expanded rapidly after evacuation of large-volume air or fluid.
- Epidemiology: Rare (<1% of cases) but up to ~20% mortality in severe cases
- Risk factors: Young age, >3 L fluid/air removed rapidly, long-standing collapse, high negative pressures
Prevention:
- Avoid very negative suction at first in chronic, large effusions/pneumothoraces
- Consider staged drainage (e.g., clamp/stop after 1–1.5 L, reassess)
Management:
- Supportive: oxygen, NIV/ventilation, conservative fluid strategy, maybe diuretics
- Treat like other non-cardiogenic pulmonary edema
Late Complications
- Infection / empyema / site infection
- Chronic pain or neuropathic pain (intercostal nerve injury)
- Tube blockage / retained hemothorax → VATS
- Scarring / cosmetic issues at insertion site
Heimlich Valve
▶A Heimlich valve is a small, specially designed flutter valve that is portable and mobile, allowing the patient to ambulate with ease.
- Attaches to the chest tube at one end and a drainage bag at the other
- The drainage bag allows air and fluid to escape but prevents their re-entering the pleural space
- Can be worn under clothing
- Functions in any position, never needs to be clamped
- Can be hooked up to suction if required
Special Situations & Pearls
▶Trauma Hemothorax
- Aim for large-bore (≥28 Fr) unless your trauma team has adopted small-bore protocols
- Massive output criteria (e.g., >1500 mL initial or >200 mL/hr) → surgical consult for thoracotomy
- If significant residual blood on imaging despite functioning tube, early VATS is preferable to a second tube
Spontaneous Pneumothorax
- BTS and other guidelines increasingly support small-bore / ambulatory systems in selected patients
- Ventilated / unstable → lower threshold for formal chest tube vs aspiration alone
ICU Pleural Effusions
- Consider ultrasound-guided pigtail catheter for effusions, especially if coagulopathy or frailty
- Several societies now endorse this as first-line
Anticoagulated Patients
- If time allows, correct coagulopathy (platelets, reversal, etc.)
- Use smaller-bore catheter + ultrasound guidance when appropriate to decrease bleeding risk
- Balance risk of bleed vs risk of ongoing tension/respiratory failure – in true emergencies, drain first
- Know your safe triangle anatomy
- Always insert above the rib to avoid the neurovascular bundle
- Finger sweep before tube insertion confirms you're in the pleural space
- Tidaling = tube in pleural space; bubbling = air leak (may be normal initially)
- Never clamp a chest tube with active air leak (risk of tension pneumothorax)
- Monitor for REPE with large/chronic evacuations
References
▶- Anderson, D. R., et al. (2022). Comprehensive review of chest tube management. JAMA Surgery, 157(3), 251–259. https://doi.org/10.1001/jamasurg.2021.7050
- Bertoglio, P., & Guerrera, F. (2019). Chest drain and thoracotomy for chest trauma. Journal of Thoracic Disease, 11(Suppl 2), S186–S198.
- Roberts, M. E., et al. (2023). British Thoracic Society guideline for pleural disease and clinical statement on pleural procedures. Thorax.
- Mongardon, N., et al. (2010). Thoracentesis and chest tube management in critical care. Chest, 137(5), 1145–1157.
- Song, I. H., et al. (2021). Severe re-expansion pulmonary edema after chest tube drainage for spontaneous pneumothorax. Acute and Critical Care, 36(4), 331–336.
- Feller-Kopman, D. (2007). Large-volume thoracentesis and the risk of reexpansion pulmonary edema. The Annals of Thoracic Surgery, 84(5), 1656–1661.
- Dev, S. P., Nascimiento, B., Simone, C., & Chien, V. (2007). Videos in clinical medicine: Chest-tube insertion. The New England Journal of Medicine, 357(15), e15. https://doi.org/10.1056/NEJMvcm071974
- Laws, D., Neville, E., & Duffy, J. (2003). BTS guidelines for the insertion of a chest drain. Thorax, 58(Suppl 2), ii53–ii59.
- Doyle, G. R., & McCutcheon, J. A. (2015). Chest tube drainage systems. In Clinical Procedures for Safer Patient Care. BCcampus. https://opentextbc.ca/clinicalskills/