

Bedside Snapshot
- Indications
- Titrated vasoactive therapy to a MAP target
- Frequent arterial blood gas or lactate sampling
- PPV or SVV in ventilated patients, per unit practice
- Shock where cuff readings are unreliable
- Contraindications / Abort
- Infection or thrombosis at the site
- Abnormal anatomy at the puncture site
- Active Raynaud or thromboangiitis obliterans in the limb
- Pale, cold or numb limb: remove per protocol
- Critical Steps
- Pressure bag at 300 mmHg; remove air
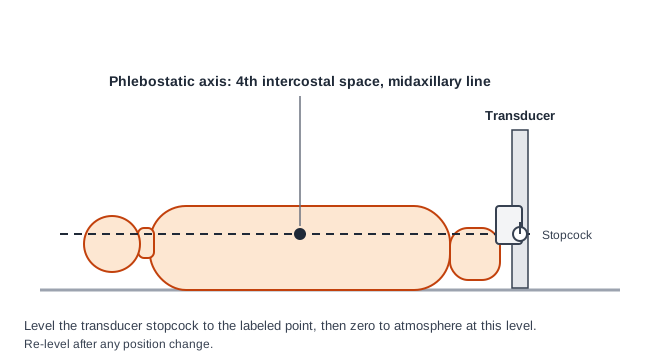
- Transducer at the phlebostatic axis (4th ICS, midaxillary)
- Zero to atmosphere at that level
- Fast-flush test before clinical use
- Label the line arterial; no drugs or IV fluid through it
- Confirm & Monitor
- Sharp upstroke and dicrotic notch
- Fast-flush test shows appropriate damping
- Re-level and re-zero after every move
- Check the limb and site at each reassessment
Key Numbers
An arterial line gives beat-to-beat pressure and a route for blood gases. Its numbers are only as good as the transducer level, the zero and the damping, so check those before you trust any value.
| Parameter | Value |
|---|---|
| Pressure bag | 300 mmHg (keeps a continuous column of fluid into the artery) |
| Transducer level | Phlebostatic axis: 4th intercostal space, midaxillary line |
| Radial catheter gauge | 20 G generally recommended; 18 G more prone to underdamping |
| Fast-flush test | Before clinical use, then repeated per protocol |
| Radial temporary occlusion | 1.5% to 35% reported (mean 19.7%); usually no sequelae |
| Radial permanent occlusion | Mean 0.09% (rare) |
| Radial local infection | Mean 0.72%; sepsis 0.13% |
| Hypotension (MAP) | Below 65 mmHg (ESICM 2014 definition) |
| Pulsus paradoxus | Inspiratory fall in systolic pressure above 10 mmHg |
| Flush solution | Crystalloid per protocol; see Medications & Settings for the heparin question |
Overview & Principles
An arterial catheter sits in a peripheral artery. A fluid-filled line runs from it to a pressure transducer and a bedside monitor. The screen shows beat-to-beat pressure, the mean arterial pressure (MAP) and the waveform that derived values come from. Most lines go in the radial artery.
How It Works
- Column of fluid: Pressurized saline carries the artery's pressure to the transducer. Blood never reaches the transducer.
- Transducer: It turns the fluid column's pressure into an electrical signal. The monitor draws that signal as the waveform.
- Reference point: The transducer must sit at the phlebostatic axis. Zero it to atmosphere at that same level.
- Damping: Tubing length, stopcocks, air and clot all change how faithfully the system tracks the real waveform.
- Sampling: The same line gives you arterial blood gas and lactate samples. No separate stick needed.
Where It Fits
An in-dwelling line gives you continuous pressure and regular blood gas analysis. Those matter most in patients not responding to initial therapy, per the ESICM 2014 consensus. A cuff reading is the fallback when the line is lost. It is not the first choice for a patient on titrated drips. For adults with septic shock on vasopressors, SSC 2021 (Evans et al.) recommends an initial MAP target of 65 mmHg (strong recommendation). It suggests invasive arterial monitoring when resources allow (weak recommendation). In ventilated patients, pulse pressure variation (PPV) and stroke volume variation (SVV) are read from the waveform. They are one part of the fluid decision.
The second hazard is disconnection. A loose or unlocked connection can bleed fast. Use Luer-lock connections, keep the insertion site in view and leave alarms on.
Indications & Contraindications
Indications
- Continuous beat-to-beat pressure during vasoactive or inotropic therapy titrated to a MAP target
- Frequent arterial blood gas or lactate sampling in critically ill patients
- Waveform-derived variation (PPV, SVV) in ventilated patients, per unit practice
- Shock or hemodynamic instability where cuff readings are unreliable, per unit protocol
Absolute Contraindications
- Infection at the planned insertion site
- Thrombosis in the target artery or at the puncture site
- Abnormal anatomy at the puncture site
- Active Raynaud syndrome or thromboangiitis obliterans in the target limb
Relative Contraindications & Cautions
- Inadequate collateral flow: The modified Allen test does not reliably predict ischemic complications. Do not clear a radial site on that test alone.
- Edema or vascular sclerosis: Cannulation gets harder. Choose a different site or an experienced operator, per protocol.
- Bleeding risk: Hematoma and minor bleeding are the most common insertion complications. Weigh coagulopathy and antithrombotic therapy per protocol.
- Femoral site: Bleeding here is hard to press shut. Puncture distal to the inguinal ligament to limit pelvic or retroperitoneal hemorrhage.
Consider an Alternative
Radial no good? The brachial, femoral, axillary or dorsalis pedis artery may be used per protocol. Each site has its own complication profile (see Anatomy & Landmarks). Need urgent access that is not arterial? See IV Insertion.
Abort / Stop Criteria
- Pulsatile flow not obtained after the attempts allowed by your protocol: stop and re-site.
- Pale, cold, numb or mottled hand or foot after insertion: remove the catheter per protocol and call for help.
- Pulsatile bleeding that does not stop with direct pressure: stop the attempt and follow the team's bleeding plan.
Scope & Team Roles
| Provider Level | Typical Role | Notes |
|---|---|---|
| EMT | Not in scope | Outside the basic EMT scope |
| AEMT | Not in scope | Not in national model — state/agency credentialing |
| Paramedic | Not in scope | Not in national model — state/agency credentialing. Monitoring a line in transport, per protocol |
| RN (ED/ICU) | Performs (protocol/credentialing required) | Insertion and maintenance per facility policy and competency |
| Critical Care Transport (CFRN / CTRN / FP-C / CCP-C) | Performs (protocol/credentialing required) | Often inherits a line from the sending team; maintains and transduces per transport protocol |
| Physician / APP | Performs | Operator for difficult or high-risk sites, per protocol |
Team Roles During the Procedure
- Operator: Chooses the site, inserts the catheter and confirms pulsatile flow.
- Sterile assistant: Prepares the drape, flush and connection to the transducer.
- Limb and monitor clinician: Holds the limb, levels and zeroes the transducer, and watches the trace.
- Recorder: Notes insertion time, site, gauge, flush solution and attempts.
Anatomy & Landmarks
| Site | Best For | Landmark | Avoid If |
|---|---|---|---|
| Radial | First choice in most adults | Between the distal radius and the flexor carpi radialis tendon, 1–2 cm proximal to the wrist | Local infection, thrombosis, active Raynaud, thromboangiitis obliterans, abnormal anatomy |
| Brachial | When the radial artery fails or is unsuitable | Medial to the biceps tendon in the antecubital fossa | Same absolute contraindications; higher-consequence complications if they occur |
| Femoral | Largest artery used; complication rate reported as comparable to other sites | Just below the midpoint of the inguinal ligament, patient supine | Same absolute contraindications; operator experience per protocol |
| Axillary, dorsalis pedis, posterior tibial, ulnar | Less frequent alternatives | Per unit protocol and operator experience | Same absolute contraindications |
Local protocol and operator experience decide the site. The complication rates below come from published series. They do not rank the sites for every patient.
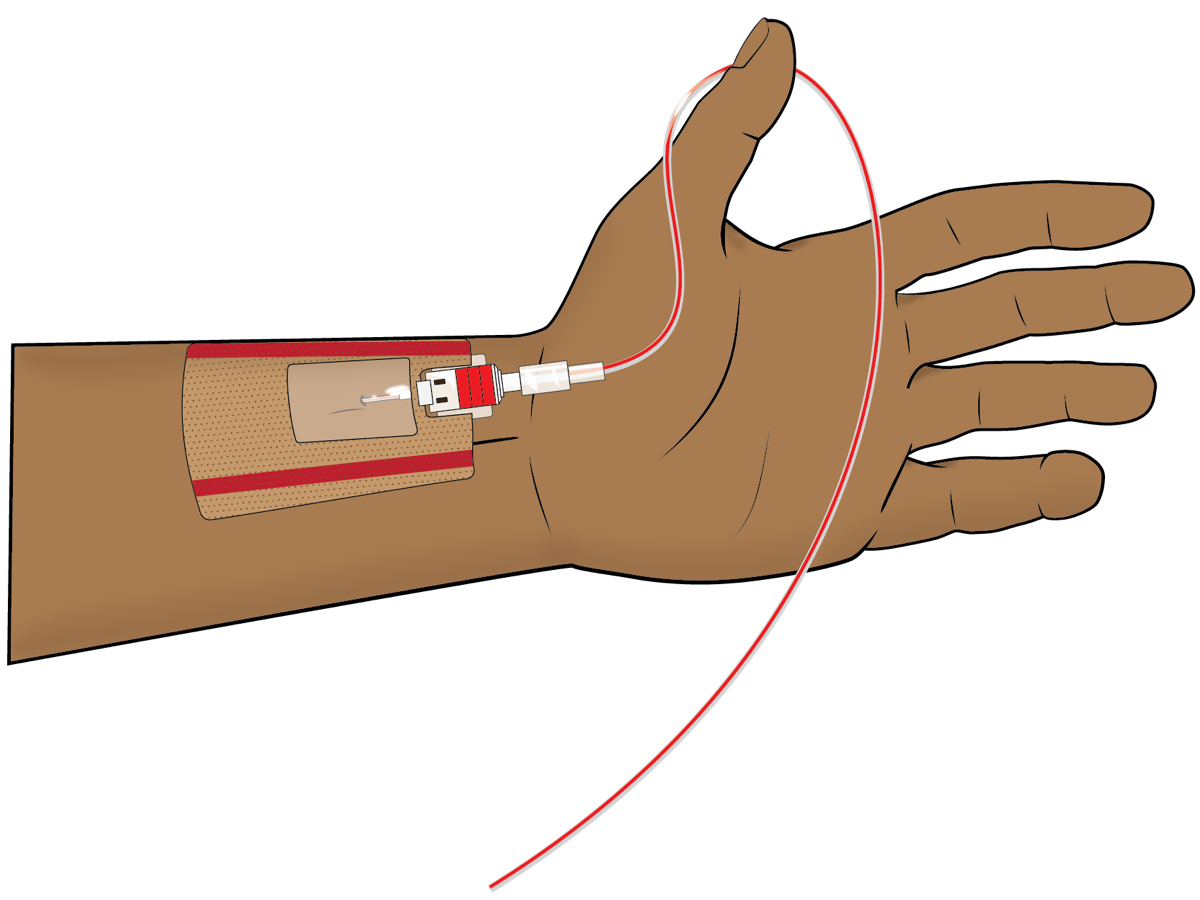
1. Radial Artery (First Choice)
- Palpate the artery: Find the pulse between the distal radius and the flexor carpi radialis tendon, 1–2 cm proximal to the wrist.
- Immobilize the wrist: Rest the wrist across a soft support with the hand secured; a 20 G catheter is generally recommended for radial cannulation.
- Prepare and drape: Use sterile technique and a skin antiseptic per protocol before the puncture.
- Insert over the wire or directly: Enter at about 30–45° to the skin with the inner needle; advance until pulsatile flow appears in the hub.
- Advance and connect: Advance the catheter, remove the needle, connect the flushed line, and secure with a dressing or suture.
Start as distal as you can. If that attempt fails, a more proximal site can be tried.
2. Brachial Artery (Alternative)
- Position: Shoulder slightly abducted, elbow extended, forearm supinated.
- Palpate: Find the brachial pulse medial to the biceps tendon in the antecubital fossa.
- Insert and secure: Enter with the same technique; confirm pulsatile flow and connect. The overall complication rate is low (about 0.2%). Its complications can still be serious.
3. Femoral Artery (Large Vessel)
- Position: Supine, with the leg straight and rotated outward.
- Palpate: Find the femoral pulse just below the midpoint of the inguinal ligament, and puncture distal to the ligament to limit pelvic or retroperitoneal bleeding.
- Insert and secure: Enter with the same technique; confirm flow, connect and secure the line.
Equipment & Preparation
Equipment
- Arterial catheter kit: Over-the-wire or single-puncture set; 20 G for radial, per site and protocol
- Pressure-monitoring tubing and transducer kit with a stopcock and a leveling reference
- Pressure bag: Soft bag in a pressure bag set at 300 mmHg, with crystalloid for the flush
- Flush solution: Crystalloid per protocol (see the heparin question in Medications & Settings)
- Sterile drape, skin antiseptic, gloves and gown
- Securement dressing or sutureless adhesive and tape
- Monitor with a waveform and a cuff for backup pressure
Sizing
| Site | Catheter | Notes |
|---|---|---|
| Radial, adult | 20 G | Generally recommended for radial cannulation; less affected by underdamping than 18 G |
| Radial, larger gauge | 18 G | More prone to underdamping and more complications |
| Brachial, femoral | Per protocol | Gauge chosen by unit and operator |
| Pediatric | Per unit protocol | See Special Populations |
Pre-Procedure Checklist
- Indication and site confirmed with the team
- Consent or emergency exception per local policy
- Site inspected for infection, thrombosis and anatomy
- Limb perfusion documented before insertion
- Pressure bag set at 300 mmHg and flush solution labeled
- Transducer, stopcock and tubing checked for air and kinks
- Monitor and waveform ready; cuff available as backup
- Sterile field and antiseptic ready; second person available
Medications & Settings
Treat these doses as typical adult and pediatric references. Check them against local protocol and the current drug labeling. Doses vary by protocol; follow local protocols and medical direction.
| Drug or Setting | Adult | Pediatric | Onset / Duration | Notes |
|---|---|---|---|---|
| Pressure bag | 300 mmHg | Per unit protocol | Continuous | Keeps the fluid column into the artery; check the bag at every handoff |
| Flush solution (crystalloid) | Per protocol | Per unit protocol | Continuous | Confirm the rate and volume on the pump or flush device |
| Heparin in the flush | Per institutional protocol | Per unit protocol | Continuous | High-alert Read units/mL on every bag. Heparinized flush is not recommended by one 2020 review because of heparin-induced thrombocytopenia (see the heparin page) |
| Medications or IV fluids through the arterial line | None | None | Not applicable | Label the line as arterial and cap unused stopcock ports. Accidental injection: see Complications |
| Lidocaine (local anesthetic) | Per the Lidocaine page local-infiltration maximum: 4.5 mg/kg plain (max 300 mg) or 7 mg/kg with epinephrine (max 500 mg), on ideal body weight | Per lidocaine page | Per product | Count the total against the lidocaine maximum |
Setting Summary
- Pressure bag: 300 mmHg, the value in the cited 2020 and 2025 reviews.
- Transducer: Leveled at the phlebostatic axis and zeroed to atmosphere at that level.
- Pump or flush rate: Per the device and unit protocol; not standardized in these sources.
Step-by-Step Procedure
Phase 1: Prepare
- Confirm the indication: Confirm the MAP target or blood gas need and the site with the team.
- Check the site and limb: Look for infection, thrombosis and anatomy problems; document distal perfusion, pulse and capillary refill.
- Set up the line: Fill the tubing with flush, connect the pressure bag at 300 mmHg, and remove air.
- Level and zero: Place the transducer at the phlebostatic axis and zero to atmosphere at that level.
Phase 2: Perform
- Position the limb: Immobilize the wrist or limb with a soft support; keep the operator's hand clear of the needle path.
- Prepare the site: Use sterile technique and skin antiseptic per protocol; drape the field.
- Palpate and insert: Enter at about 30–45° with the inner needle; watch the hub for pulsatile flow.
- Advance the catheter: Over-the-wire technique: advance the wire, remove the needle, then advance the catheter over the wire.
- Connect: Connect the catheter to the flushed tubing, keeping the line free of air and every connection locked.
Phase 3: Confirm & Secure
- Run the fast-flush test: Activate the flush device to produce a square wave and check the oscillations (see Confirmation & Monitoring).
- Secure and dress: Use a securement dressing or sutures; keep the limb in a neutral position.
- Document: Record time, site, gauge, attempts, flush solution, zero and level, and distal perfusion.
Alternative technique: a unit that uses a catheter-over-needle set in place of the wire technique follows the device instructions for flashback and advancement.
Confirmation & Monitoring
Primary Confirmation
You have a good trace when the transducer sits level with the phlebostatic axis, is zeroed to atmosphere, and the fast-flush test shows an appropriately damped response. A damped or unreliable trace tells you to fix the system before you use the number.
Fast-Flush Test
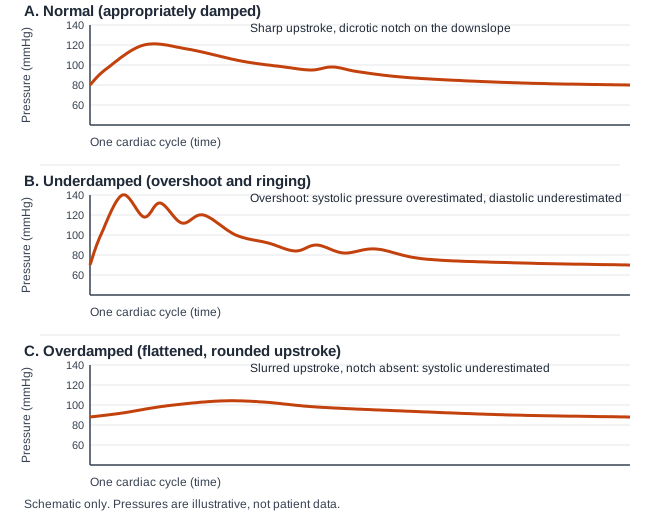
Briefly activate the flush device. It applies a 300 mmHg pressure, which makes a square wave followed by oscillations. The decay shows the natural frequency and damping coefficient of the whole system. Underdamped? You see several oscillations after the square wave. Overdamped? Little or no rebound, and a slow return. Appropriate damping sits between those two patterns, per device and unit protocol.
Secondary Confirmation
- Waveform: Sharp upstroke, dicrotic notch on the downslope, and a smooth diastolic descent per the 2025 review.
- Site: No swelling, bleeding or hematoma; dressing secure.
- Limb: Warm, pink, with a palpable or Doppler pulse per unit practice.
| Finding | Success | Failure / Problem |
|---|---|---|
| Waveform | Sharp upstroke and dicrotic notch | Rounded upstroke: overdamped or a clot, air or kink |
| Fast-flush test | Appropriate damping, between the underdamped and overdamped patterns | Several oscillations after the square wave (underdamped), or little or no rebound (overdamped) |
| Level and zero | Phlebostatic axis; zeroed to atmosphere | Wrong level or zero: every number is offset |
| Limb | Warm, pink, with perfusion | Pale, cold or numb: remove and treat per protocol |
Waveform-Derived Values
In ventilated patients, you read pulse pressure variation (PPV) and stroke volume variation (SVV) off the arterial waveform. The ESICM 2014 consensus recommends dynamic over static variables for fluid responsiveness when applicable. Its advantage shows up only in highly selected patients. The limits are controlled mechanical ventilation without spontaneous breathing efforts, tidal volume effects and unstable patients. A 2025 review also lists arrhythmia and a tidal volume below 8 mL/kg as limits.
Pulsus Paradoxus
Pulsus paradoxus is an inspiratory fall in systolic pressure greater than 10 mmHg, per Hamzaoui 2013. The arterial line makes it measurable beat by beat. You see it in cardiac tamponade and in severe asthma or COPD exacerbation. It also helps track bronchodilator response. Read the arterial trace across the respiratory cycle, not one breath.
Ongoing Monitoring
- Each shift and after every change: Check the waveform, level, zero and damping.
- Every position change: Re-level and re-zero the transducer.
- Hourly: Check MAP against target, the limb and the site.
- Each reassessment: Check the dressing, bleeding and the flush; record the reason the line stays in.
Troubleshooting
| Problem | Likely Cause | Fix |
|---|---|---|
| Damped (rounded) trace | Clot or air in the line, low pressure bag, closed or partly closed stopcock, kinked tubing, catheter against the vessel wall | Check the patient first; confirm the pressure bag is at 300 mmHg; trace the line for air, clot and stopcocks; fast-flush test; re-level and re-zero; reposition or replace per protocol |
| Underdamped trace | Overshoot: systolic pressure overestimated, diastolic underestimated, pulse pressure overestimated. Causes include a defective transducer, a large-radius catheter, and extra stopcocks or tubing | Shorten the tubing and use stiff, non-compliant lines; remove extra stopcocks and microbubbles; stabilize the catheter; add an adjustable damping device per device instructions; repeat the fast-flush test. Treat systolic values as overestimated until fixed |
| Lost trace | Disconnected cable or transducer, clotted line, or catheter migrated against the wall | Check cable and connections; fast-flush test; use a cuff MAP until fixed; re-site if the catheter cannot be made to read |
| No flow on insertion | Needle not in the artery, or vasospasm | Re-palpate; stop after the attempts allowed by protocol; re-site; do not keep advancing blindly |
| Cuff and line disagree | Wrong level or zero, or an unreliable waveform | Confirm level and zero; run the fast-flush test; compare with the cuff on the other arm; report |
| Bleeding at the site | Dislodgement, loose dressing or antithrombotic therapy | Direct pressure above the puncture; secure the line; team review of anticoagulation |
If the Limb Turns Ischemic
- Call for help: Notify the team at once.
- Stop the flush and remove the catheter per protocol.
- Treat the limb: Check perfusion, warmth and pulses; follow the team's ischemia plan.
- Document: Time of onset, site, gauge, and the actions taken.
Complications
| Complication | Recognition | Prevention | Management |
|---|---|---|---|
| Immediate: Pain and paresthesia | Pain or tingling at the site during insertion | Gentle technique; a small gauge | Reposition or remove per protocol; reassess |
| Immediate: Hematoma and minor bleeding | Swelling or oozing at the puncture | Firm pressure after removal; secure the dressing | Direct pressure; monitor; treat per protocol |
| Immediate: Disconnection / blood loss | Blood at a loose or open connection; alarm or sudden loss of the waveform | Lock every connection; keep the site visible; alarms on | Direct pressure above the site; clamp the line; reconnect or replace per protocol; call for help |
| Immediate: Inadvertent intra-arterial injection | Pain, pallor, coldness or numbness of the limb after a drug or flush is given through the line | Label the line as arterial; cap unused ports; never give drugs or IV fluid through it | Stop; call the physician at once; assess the limb; treat per physician and unit protocol |
| Immediate: Air or thrombotic embolism | Sudden deterioration, new neurologic change, or a line that will not flush | Air-free set-up; avoid air in the line | Stop the flush, clamp, and call for help; treat per protocol |
| Delayed: Temporary radial occlusion | Absent pulse or altered perfusion of the hand | Check the hand before and after insertion | Usually no sequelae; re-check perfusion; remove if the hand is ischemic |
| Delayed: Permanent occlusion or ischemic damage | Persistent pallor, cold or pain in the hand or foot | Assess the limb at every reassessment | Treat the limb per the team's plan; reported as rare (mean 0.09%) |
| Delayed: Pseudoaneurysm and infection | Pulsatile swelling or fever with site redness | Aseptic insertion; remove lines that no longer change management | Imaging and removal per team; treat infection per protocol |
Special Populations
Pediatrics
This page's sources give no pediatric arterial line sizes, sites or flush rates. Take site, gauge, flush and pressure from the unit's pediatric protocol. For normal values and vascular access, go to the pediatric pages below.
- Sites and gauge: Per the pediatric unit protocol and operator experience; not established in this page's sources.
- Flush and pressure: Per unit protocol; settings differ by age and size.
- Normal values: Pediatric MAP and vital sign thresholds apply, not adult values.
- Links: Pediatric Vascular Access, Pediatric Vital Signs and Weight-Based Dosing.
Older Adults
- Vessel quality and calcification vary. Check the site and distal perfusion before and after insertion.
- Take the MAP target from the clinical plan. The ESICM hypotension definition is written for adults.
Physiologically Difficult
- Raynaud or thromboangiitis obliterans: Contraindicated in the affected limb (see Indications & Contraindications).
- Pulsus paradoxus: An inspiratory fall above 10 mmHg in tamponade, severe asthma or COPD exacerbation. The line helps you monitor it.
- Mechanical ventilation: PPV only counts in patients on controlled ventilation with an appropriate tidal volume and no arrhythmia.
Post-Procedure Care & Transport
Immediate Aftercare
- Secure the line: Use the securement dressing; keep the limb in a neutral position.
- Check the limb: Perfusion, warmth and pulse after insertion and at every reassessment.
- Label and protect: Keep the line labeled as arterial, ports capped and connections locked.
Ongoing Maintenance
- Keep the transducer leveled and zeroed; re-zero after every position change.
- Maintain the pressure bag at 300 mmHg and check the flush at every handoff.
- Removal: Remove per protocol; hold firm pressure until hemostasis, then check distal perfusion.
Transport Considerations
- Re-level and re-zero the transducer after every move that changes the patient's position.
- Lock and watch the connections: A disconnected arterial line can bleed quickly. Keep the site visible and alarms on.
- No drugs through the line: Staff in transport must not give medications or fluids through it. Check the limb after each move.
- Check every connection for air; gas in a closed line expands as ambient pressure falls, which matters for air transport.
- Watch the trace and the limb after each move; report a lost trace and use a cuff until it is fixed.
- Keep the transducer, bag and flush in view; check their supply before departure.
Document & Hand Off
- Time of insertion, site (side and artery), gauge and attempts
- Flush solution, pressure bag setting, and zero and level
- Fast-flush result and last waveform quality
- Last MAP against target and vasoactive drugs with doses
- Limb and site status at handoff; any complication
- Blood gas and lactate times; line review due time
Clinical Pearls & Pitfalls
Pearls
- Level before you read: Every pressure you read is referenced to the phlebostatic axis.
- Test the system: The fast-flush test tells you whether the system follows the artery.
- Radial first, 20 G: For the radial site, a 20 G catheter is generally recommended.
- Modified Allen is weak: It does not reliably predict ischemic complications.
- Label the line: Mark it arterial. Never give drugs or IV fluid through it.
- Trace the line: Air, clot, closed stopcocks and kinks are common causes of a damped or lost trace. Check them before you blame the heart.
Common Pitfalls
- Trusting a damped trace → run the fast-flush test first.
- Reading PPV in spontaneous breathing → use other indices or the team's plan.
- Forgetting to re-zero after a move → re-level and re-zero.
- Ignoring the limb → check perfusion at every reassessment.
- Giving a drug through the arterial line → stop, call the physician, assess the limb.
References
- Scheer B, Perel A, Pfeiffer UJ. Clinical review: complications and risk factors of peripheral arterial catheters used for haemodynamic monitoring in anaesthesia and intensive care medicine. Crit Care. 2002;6(3):199–204. https://doi.org/10.1186/cc1489
- Evans L, Rhodes A, Alhazzani W, et al. Surviving Sepsis Campaign: international guidelines for management of sepsis and septic shock 2021. Intensive Care Med. 2021;47(11):1181–1247. https://doi.org/10.1007/s00134-021-06506-y
- Cecconi M, De Backer D, Antonelli M, et al. Consensus on circulatory shock and hemodynamic monitoring. Task force of the European Society of Intensive Care Medicine. Intensive Care Med. 2014;40(12):1795–1815. https://doi.org/10.1007/s00134-014-3525-z
- Hamzaoui O, Monnet X, Teboul JL. Pulsus paradoxus. Eur Respir J. 2013;42(6):1696–1705. https://doi.org/10.1183/09031936.00138912
- Saugel B, Kouz K, Meidert AS, Schulte-Uentrop L, Romagnoli S. How to measure blood pressure using an arterial catheter: a systematic 5-step approach. Crit Care. 2020;24:172. https://doi.org/10.1186/s13054-020-02859-w
- Bertrand M, Goury A, Chemla D, Teboul JL, Hamzaoui O. Applied physiology at the bedside: using invasive blood pressure as a true monitoring tool. Ann Intensive Care. 2025;15:192. https://doi.org/10.1186/s13613-025-01608-y
Medical Disclaimer
- For Educational Purposes Only: This content is intended for educational reference and should not be used for clinical decision-making.
- Not a Substitute for Professional Judgment: Always consult your local protocols, institutional guidelines, and supervising physicians.
- Verify Before Acting: Users are responsible for verifying information through authoritative sources before any clinical application.