

Bedside Snapshot
- Indications
- Arrest or shock with no fast IV
- IV attempt limit reached (protocol)
- Drug or fluid that cannot wait
- Equipment & Size
- Pink 15 mm: 3–39 kg
Blue 25 mm: 3 kg and up (manufacturer); pink is the usual choice under 40 kg
Yellow 45 mm: 40 kg and up, or excess tissue
Flush: 2–5 mL saline (child) - Key Steps
- Site: proximal tibia first; distal femur or humerus by age
Angle: 90° to bone
Depth: 5 mm mark visible before drilling - Confirm Placement
- Needle stands alone; saline flushes freely with no swelling. A blood aspirate supports placement.
- Abort or Alternative
- Flush resists or site swells: stop, re-site
- Fracture or infection at site: other site
- Remove within 24 h; replace with IV
Overview & Pediatric Differences
In a sick child, vascular access is often the slowest step in resuscitation. Get a route now, one that moves drugs and fluid. The better line can come later, once the child is stable. Shock and cold collapse small peripheral veins. That's why the intraosseous (IO) route is the fallback. It does not rely on them.
Why Kids Are Different
- Small, hard-to-find veins: low volume, cold and vasoconstriction all shrink peripheral veins, sometimes until none can be found.
- A non-collapsible route: marrow behaves like a big vein that can't collapse, so IO flow holds even when peripheral veins fail (manufacturer data).
- Neonatal anatomy: the umbilical vein and arteries are the neonatal routes. Where the tip sits is a safety issue.
- Same dose, different route: drugs and fluids given IO use the same dose, rate and concentration as IV. Calculate the weight-based dose as usual, and that's the dose you give.
Indications & Contraindications
Indications
- Cardiac arrest or shock when IV access is not rapidly available
- Failed peripheral IV attempts that reach the local limit (protocols commonly use 2 attempts or 90 seconds)
- Drugs or fluids that cannot wait for an IV
- Newborn needing emergency vascular access when IV access is not successful or not feasible: IO can be useful (2025 AHA Guidelines for CPR and ECC, Part 5, COR 2a, LOE C-LD). The umbilical vein remains the preferred route
Contraindications
- Absolute: fracture of the target bone (fluid leaks through the break), and infection or burn at the insertion site
- Use another site: an IO attempt in the same bone within the previous 48 hours, orthopedic surgery or a prosthesis at the site, excess tissue that hides the landmarks, or a landmark that cannot be identified (manufacturer pediatric sheet)
Set the Attempt Limit Before the Call
Set the failed-IV limit before the call, and follow your protocol. Don't keep chasing an IV while a drug waits. How many attempts or seconds you get depends on the protocol.
The 2025 AHA Guidelines for CPR and ECC want fast access for drugs in pediatric cardiac arrest. Start it fast, by IV or IO (Part 8, Recommendation 7.1, COR 1, LOE C-LD). Pick between them by availability, expertise and timeliness (COR 1, LOE C-EO). Here's what people miss: the guideline sets no attempt count.
Equipment & Sizing
| Hub Colour | Length | Weight Band (Manufacturer) |
|---|---|---|
| Pink | 15 mm | 3–39 kg |
| Blue | 25 mm | 3 kg and up (manufacturer) |
| Yellow | 45 mm | 40 kg and up, or excess tissue |
Pink is the usual choice under 40 kg. The manufacturer's pediatric sheet puts pink at 3–39 kg and blue at 3 kg and up. Blue comes out only when local protocol or tissue depth calls for it. Yellow is the 45 mm needle for 40 kg and up, or for excess tissue depth. Those cut-offs are set by local protocol.
Kit
- EZ-IO power driver and needle set
- EZ-Stabilizer dressing and EZ-Connect extension set (priming volume about 1.0 mL)
- Saline flush: 2–5 mL for an infant or child; 5–10 mL for an adult
- Preservative-free and epinephrine-free lidocaine 2% for an awake patient, per protocol (review the lidocaine cautions and contraindications)
- Pressure bag or infusion pump, tubing and a stopcock

Procedure: Peripheral IV Access
A peripheral IV is the first choice, as long as it goes in quickly. Hit your attempt limit, then move to IO. Don't keep extending the attempts.
Common Sites
| Site | Landmark | Best For | Notes |
|---|---|---|---|
| Dorsal hand | Back of the hand and wrist | Infants and children | Easy to see in many children; a good first look |
| Antecubital | Front of the elbow | Older children and adolescents | Useful for resuscitation access when visible |
| Saphenous | Anterior to the medial malleolus | Infants and young children | Reliable when hands and arms fail |
| Scalp veins | Scalp, with transillumination | Neonates and young infants | Valveless; shine a light underneath to see them |
| External jugular | Side of the neck | Children | Peripheral, not central; visible with head down and turned away |
- Choose the vein: pick a visible or palpable vein that is straight and stable.
- Improve the view: warm the limb, use transillumination in infants, lower the limb below heart level, or apply a tourniquet (in neonates, an assistant's finger can serve).
- Insert and anchor: advance the catheter, then secure it so it cannot move.
- Confirm: look for blood return and a flush that runs without swelling.
- Stop at the limit: after your attempt limit, place an IO.
Size up as far as the vein safely allows, per local protocol. Landmark attempts failing? Use ultrasound guidance if your program has it. Still delayed? Follow protocol for non-vascular routes such as intramuscular or intranasal medications.
Procedure: Intraosseous (IO) Access
An IO needle goes into the marrow cavity of a long bone. The manufacturer calls the marrow a non-collapsible venous space. Most drugs and fluids given IV can go IO at the same dose, rate and concentration. Verify flow before every infusion.
IO Sites
| Site | Landmark | Best For | Notes |
|---|---|---|---|
| Proximal tibia | Flat anteromedial surface about 1 cm medial to the tibial tuberosity, or just below the patella (about 1 cm) and slightly medial | All ages (first choice) | Most familiar site; keep the needle away from the growth plate. Figure 2 shows the landmark |
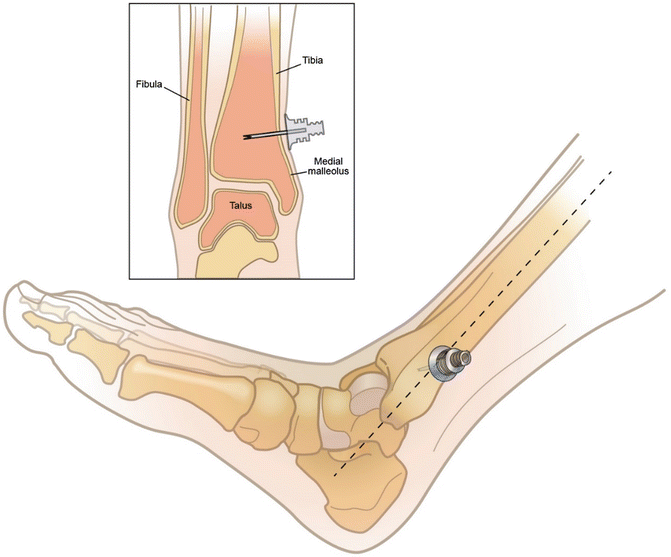
| Distal tibia | Flat anterior surface above the medial malleolus | All ages (alternative) | Use when the proximal site is unsuitable. Figure 3 shows the landmark |
| Distal femur | About 1 cm above the superior border of the patella, 1–2 cm medial to midline | Children | Keep the knee straight so it cannot bend. Not for femur fracture |
| Proximal humerus | Greater tubercle, with the arm across the abdomen | Older children and adolescents, per protocol | Needle length by weight band (see Equipment and Sizing). Do not abduct the arm past 90 degrees; minimize movement |
Insertion Steps
- Prime: confirm the lidocaine dose per protocol. The extension set holds about 1.0 mL, so for small pediatric doses (a 10 kg child's 0.5 mg/kg dose is 0.25 mL), attach the syringe directly to the needle hub and prime the set with saline. Prime with lidocaine only when the dose volume matches the priming volume.
- Position and clean: stabilize the limb and clean the site per protocol. For the distal femur, keep the leg straight.
- Set the needle: aim at 90° to the centre of the bone and press gently until the tip touches bone.
- Check the 5 mm mark: the 5 mm black mark must be visible above the skin before you drill.
- Drill: squeeze the trigger and apply gentle, steady pressure until the hub seats. If the driver fails, advance by hand with a twisting motion.
- Stabilize and dress: remove the driver and stylet, apply the EZ-Stabilizer dressing, and attach the extension set (primed as in step 1) with the clamp open.
- Flush: flush with 2–5 mL saline for a child. It must run without resistance or swelling.
- Document: record the time, site, needle length, flush result and any pain.

Procedure: Umbilical Venous Catheter (Neonates)
In a neonate, the umbilical vein is the fast route for drugs and fluid. Trained staff place it. The 2025 AHA Guidelines for CPR and ECC, Part 5, recommend umbilical vein catheterization for newborns who need emergency vascular access (COR 1, LOE C-LD). When intravenous access fails or isn't feasible, IO can be useful (COR 2a, LOE C-LD).
Anatomy
The cord usually holds one large, thin-walled vein and two smaller, thick-walled arteries. The vein is the one you catheterize.
Insertion Length
A formula gives you a starting length, nothing more. The UAC formula above is for the high position. A low UAC (L3–L5) needs a different length. Confirm the tip position by X-ray or ultrasound.
Target Tip Positions
| Catheter | Target Tip | Notes |
|---|---|---|
| UVC | T8–T9 (T7–T10 acceptable), at the junction of the inferior vena cava and right atrium or in the ductus venosus | A tip that is too low risks liver injury, necrotizing enterocolitis and portal vein thrombosis |
| UAC, high | T7–T9, in the descending aorta above the diaphragm | Avoid the origins of the mesenteric, celiac and renal arteries |
| UAC, low | L3–L5, at or below the aortic bifurcation | Confirm the position on imaging before use |
Emergency Placement in Resuscitation
In an emergency, advance the catheter only until blood returns freely. That shallow, low-lying spot limits how much drug reaches the liver and portal system. Once the baby is stable and needs ongoing central access, reposition or replace the catheter to the measured, imaging-confirmed position below.
Insertion Steps
- Prepare: trim the cord to a short stump, secure it with a tie, and prepare a sterile field.
- Identify: find the single thin-walled vein (usually at about 12 o'clock) and the two arteries.
- Measure: calculate the insertion length before you start, and add the stump length.
- Insert gently: pre-flush the catheter, then advance toward the head to the calculated length. In an emergency, advance only until blood returns freely.
- Confirm: check blood return and a free flush, then confirm the tip on X-ray or ultrasound.
- Reposition and secure: adjust the depth if the tip is high or low, then secure the catheter.
Procedure: Central Venous Access
Trained teams usually place central lines when peripheral and IO routes are not enough, or when the child needs a line for longer therapy. The 2022 SHEA CLABSI update, written for acute-care hospitals, covers adults and children. It recommends ultrasound guidance for catheter insertion. Every insertion gets maximal sterile barrier precautions. For older infants and children, chlorhexidine-alcohol is the usual skin prep. In preterm infants and infants under 2 months, use chlorhexidine with caution, since its label warns of irritation or chemical burns. Follow local neonatal policy, and remove excess prep after the procedure.
| Site | Advantages | Disadvantages |
|---|---|---|
| Femoral vein | Easy landmark, compressible, no pneumothorax risk, does not need head-down positioning | Groin infection risk; leg position can interfere with CPR |
| Internal jugular | Reliable anatomy with ultrasound guidance | Pneumothorax and carotid puncture risk; hard to place with a cervical collar |
| Subclavian | Preferred in ICU settings to reduce infectious complications (2022 SHEA guidance) | Pneumothorax risk; not compressible; technically difficult in small children |
- Confirm the need: place a central line only when the access problem and the therapy justify it.
- Prepare the field: use maximal sterile barrier precautions and the skin prep chosen for the child's age, as described above.
- Insert with ultrasound: visualize the vein and needle, and limit passes.
- Confirm: check blood return, flush, and confirm the tip position by imaging.
- Remove when no longer needed: remove nonessential catheters promptly.
Confirmation & Troubleshooting
Signs of Correct Placement
- IO: the needle stands stable, and saline flushes without resistance or swelling. Blood on aspiration backs up placement. No blood does not mean failure.
- UVC: free blood return and a tip in the target zone on X-ray or ultrasound.
- Peripheral IV: blood return and a flush that runs without swelling.
| Problem | Likely Cause | Fix |
|---|---|---|
| IO flush resists | Needle not in the marrow or moved | Re-check the 5 mm mark and depth; re-site if it persists |
| Swelling at the IO site | Extravasation | Stop the infusion, remove the needle, re-site |
| IO needle loose | Poor stabilization | Re-stabilize; re-site if it cannot be fixed |
| UVC has no blood return | Tip against a wall or wrong position | Do not force; withdraw, re-check, confirm the tip by imaging |
| Peripheral IV infiltrates | Vein blown or catheter dislodged | Stop, remove, and re-site |
Complications
| Complication | Recognition | Prevention or Management |
|---|---|---|
| IO extravasation and compartment syndrome | Swelling, pain, pallor, pain on passive movement | Assess the site and limb often; stop the infusion and remove the needle. Extravasation can progress to compartment syndrome (manufacturer) |
| UVC malposition | Abnormal tip on X-ray or ultrasound | Reposition. A low tip is linked to necrotizing enterocolitis, liver injury and portal vein thrombosis |
| Central line infection | Fever, sepsis signs, redness at the site | Maximal sterile barrier at insertion; for preterm infants and infants under 2 months, chlorhexidine only with caution and local neonatal policy; remove nonessential catheters (2022 SHEA guidance) |
| Pneumothorax (IJ or subclavian) | Dyspnea, falling SpO₂, reduced breath sounds | Ultrasound guidance; treat per protocol |
Medications & Dosing
| Drug | Dose & Route | Max | Notes |
|---|---|---|---|
| Lidocaine 2%, preservative-free and epinephrine-free (IO pain) High-alert |
Child: 0.5 mg/kg IO over 120 s = 0.025 mL/kg of 20 mg/mL (2%) |
40 mg first dose |
Small doses: attach the syringe directly to the needle hub and prime the set with saline (see Procedure step 1). Dwell 60 s, then flush 2–5 mL saline. Then half the first dose (0.25 mg/kg) IO over 60 s, repeat as needed. Adult: 40 mg, then 20 mg. Awake patients only. Review lidocaine cautions and contraindications (for example, amide anesthetic allergy). Counts toward total lidocaine. |
| Epinephrine 0.1 mg/mL (IV/IO) (child, arrest) High-alert |
0.01 mg/kg IV/IO = 0.1 mL/kg of 0.1 mg/mL |
1 mg per dose |
Every 3–5 min until ROSC (2025 AHA Part 8, COR 2b, LOE C-LD). Give IO at the same dose as IV (the Part 8 pediatric cardiac arrest algorithm lists IV or IO at this dose). Flush after each drug. |
| Epinephrine 0.1 mg/mL (IV/IO) (neonate) High-alert |
0.01–0.03 mg/kg IV/IO = 0.1–0.3 mL/kg of 0.1 mg/mL |
None established |
Give when heart rate stays below 60/min after ventilation and chest compressions are optimized (2025 AHA Part 5, COR 1, LOE B-NR). Follow with a 3 mL normal saline flush, regardless of birth weight. Additional doses every 3–5 min, preferably intravascular, if heart rate stays below 60/min (COR 2b, LOE C-LD). |
| Epinephrine 0.1 mg/mL (neonate, endotracheal) High-alert |
0.05–0.1 mg/kg endotracheal = 0.5–1 mL/kg of 0.1 mg/mL |
None established |
Reasonable while vascular access is being obtained (2025 AHA Part 5, COR 2a, LOE C-LD). Give intravascular epinephrine as soon as access is obtained (COR 2a, LOE B-NR); a higher endotracheal dose is likely needed to approach intravascular levels. |
| Normal saline or blood (neonate, volume) | 10–20 mL/kg intravascular (umbilical line preferred; IO alternative) = 10–20 mL/kg normal saline, or blood |
Reassess after each bolus |
Consider for evidence of hypovolemia when the newborn stays bradycardic (below 60/min) despite ventilation, compressions and epinephrine (2025 AHA Part 5, COR 2b, LOE C-EO). Normal saline is the crystalloid of choice. Repeat 10–20 mL/kg if the response is inadequate. A steady infusion over 5–10 min may be reasonable; no trial has set an optimal infusion rate (2025 AHA Part 5, volume expansion supporting text). When blood loss is substantial, uncrossmatched type O, Rh-negative blood is preferred. |
Pitfalls & Safety Checks
| Pitfall | Consequence | Prevention |
|---|---|---|
| Drilling without checking the 5 mm mark | Needle too short for marrow, or too long for a second puncture | Check the mark before every insertion |
| Infusing into swelling or resistance | Extravasation and compartment syndrome | Flush first; stop at the first swelling or resistance |
| Skipping lidocaine in an awake child | Severe pain with every push | Dose lidocaine per the priming rule in Procedure step 1; allow the 60 s dwell before the flush |
| Forgetting the total lidocaine dose | Toxicity from doses given on top of each other | Track the total across all routes |
| Forcing a UVC | Malposition and liver injury | Withdraw and re-check; confirm the tip by imaging |
| Delaying access past the trigger | Epinephrine and other drugs delayed during arrest | Agree on the failed-IV limit before the call |
Special Populations
Neonates and Young Infants
- Only trained staff place a UVC. Neonatal drug doses differ from child doses, so use the neonatal doses in the table above.
- Neonatal epinephrine is given at 0.01–0.03 mg/kg IV/IO; check the tip of every umbilical catheter before use.
- Scalp veins have no valves, so shine a light underneath to see them.
Adolescents and Larger Children
- Use adult needle sizes and sites at 40 kg or more, or per your protocol.
- Switch to adult drug doses only when your protocol's switch rule applies.
Obesity and Excess Tissue
- Excess soft tissue hides the landmarks. Reach for the longer 45 mm needle, or choose another site.
- Choose the dosing weight by your weight hierarchy (see the weight-based dosing page).
Children With Existing Devices
- Note any existing IO, central line or port, and its site and date, before placing a new device.
Prehospital & Transport Considerations
| Level | Typical Role in This Topic |
|---|---|
| EMT | Not in scope for IO |
| AEMT | Performs IO only where the state protocol includes it |
| Paramedic | Performs IO and peripheral access per protocol |
| RN (ED/ICU) | Performs per facility policy and competency |
| Critical Care Transport | Performs per transport program protocol |
- Prepare lidocaine and saline flushes before the attempt, labelled and drawn to the dose.
- Secure the needle set with the dressing, and check the site and limb at every move.
- Infuse under pressure with a pressure bag or pump for fluids and drugs.
- Keep an infant warm during the procedure and transport.
- Hand off the line type, site, time placed and everything infused.
- Flag any IO in place for MRI: no MRI with an IO in place.
- Keep a humerus IO arm below 90 degrees of abduction and minimize movement; keep a distal femur IO leg extended and stabilized.
Clinical Pearls
References
- American Heart Association; American Academy of Pediatrics. Lasa JJ, Topjian AA, et al. Part 8: Pediatric Advanced Life Support: 2025 American Heart Association and American Academy of Pediatrics Guidelines for Cardiopulmonary Resuscitation and Emergency Cardiovascular Care. Circulation. 2025;152(16 suppl 2). https://doi.org/10.1161/CIR.0000000000001368. Full text: https://cpr.heart.org/en/resuscitation-science/cpr-and-ecc-guidelines/pediatric-advanced-life-support
- American Heart Association; American Academy of Pediatrics. Lee HC, Strand ML, et al. Part 5: Neonatal Resuscitation: 2025 American Heart Association and American Academy of Pediatrics Guidelines for Cardiopulmonary Resuscitation and Emergency Cardiovascular Care. Circulation. 2025 Oct 21. https://doi.org/10.1161/CIR.0000000000001367. Full text: https://cpr.heart.org/en/resuscitation-science/cpr-and-ecc-guidelines/neonatal-resuscitation
- Teleflex Incorporated. Arrow EZ-IO Intraosseous Vascular Access System: Clinical Resource, Pediatric. Teleflex; 2015. https://www.teleflex.com/anz/en/product-areas/emergency-medicine/intraosseous-access/arrow-ez-io-system/literature/VA_IOS_Arrow-EZ-IO-Ped.pdf
- Teleflex Incorporated. Arrow EZ-IO Distal Femur Insertion Site Identification: Infant/Child. MCI-2019-0406. 2020. https://www.teleflex.com/global/clinical-resources/documents/MCI-2019-0406_Distal_Femur_Insertion_Site_Identification_(Infant_Child)_LR.pdf
- Teleflex Incorporated. Arrow EZ-IO Intraosseous Vascular Access: Care, Maintenance, and Removal. MCI-2019-0394. 2020. https://www.teleflex.com/global/clinical-resources/documents/MCI-2019-0394_VA_DS_EZ-IO_Intraosseus_Vascular_Access_LR.pdf
- Zubi ZBH, Abdullah AFB, Helmi MABM, et al. Indications, measurements, and complications of ten essential neonatal procedures. Int J Pediatr. 2023;2023:3241607. https://doi.org/10.1155/2023/3241607
- Ponin L, Ruangkit C, Ruangwattanapaisarn N, et al. Real-time ultrasound to assess the umbilical catheter position in neonates: a randomized, controlled trial. J Perinatol. 2025;45(2):235–241. https://doi.org/10.1038/s41372-024-02128-6
- Buetti N, Marschall J, Drees M, et al. Strategies to prevent central line-associated bloodstream infections in acute-care hospitals: 2022 Update. Infect Control Hosp Epidemiol. 2022;43(5):553–569. https://doi.org/10.1017/ice.2022.87
Medical Disclaimer
- For Educational Purposes Only: This content is intended for educational reference and should not be used for clinical decision-making.
- Not a Substitute for Professional Judgment: Always consult your local protocols, institutional guidelines, and supervising physicians.
- Verify Before Acting: Users are responsible for verifying information through authoritative sources before any clinical application.