

Bedside Snapshot
- Indications
- Suspected ACS: ECG within 10 min of first medical contact
- Suspected posterior or lateral MI: add V7 to V9
- Suspected RV infarction with inferior STEMI: add V4R
- Contraindications / Abort
- No absolute contraindication identified
- Cannot lie flat: record seated and state it
- Tremor or interference: reduce movement, then repeat
- Critical Steps
- Calibrate: 25 mm/s and 10 mm/mV
- V1 and V2 at the 4th ICS; V4 at the 5th ICS, midclavicular line
- Check limb polarity before transmitting
- Women: chest leads on breast tissue, not under it
- Confirm & Monitor
- No limb lead fully inverted or flat
- Smooth R-wave progression from V2 to V4
- Repeat after any repositioning
Key Numbers
Only correctly placed electrodes give a diagnostic 12-lead. In suspected acute coronary syndrome, the tracing is time-critical: obtain it within 10 minutes of first medical contact.
| Parameter | Value |
|---|---|
| Calibration | 25 mm/s and 10 mm/mV; confirm on every tracing |
| Limb electrodes | RA, LA, LL and RL (or N, neutral), at the wrists and ankles Proximal sites if limb access is limited |
| V1 and V2 | 4th intercostal space: V1 at the right sternal border, V2 at the left |
| V4 | 5th intercostal space at the left midclavicular line |
| V3 | Midway between V2 and V4 |
| V5 and V6 | Same horizontal level as V4: V5 at the anterior axillary line, V6 at the midaxillary line |
| Posterior V7 to V9 | Same horizontal level as V4: V7 posterior axillary line, V8 midscapular line, V9 left paraspinal line |
| Right-sided V4R | Mirror image of V4: 5th intercostal space at the right midclavicular line V1R and V2R mirror V1 and V2 |
| Timing | ECG within 10 minutes of first medical contact (2023 ESC ACS guideline) |
Overview & Principles
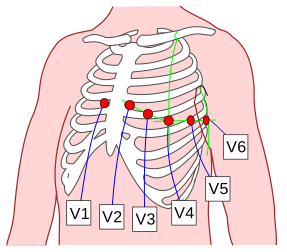
A standard 12-lead uses ten electrodes. Four go on the limbs. Six go on the anterior chest wall, V1 to V6. Each lead watches the heart from one fixed site. Move an electrode and the waveform changes, and the error can look like disease.
How It Works
- Limb electrodes: four of them, RA, LA, LL and RL (or N as the neutral reference). Swap two and whole leads flip polarity.
- Chest electrodes: V1 to V6 sit on the anterior chest wall. Swap two neighbors, or set one a space high or low, and the R-wave progression changes.
- Standard settings: 25 mm/s and 10 mm/mV, every time. Record at other settings and every amplitude and interval you read shifts with them.
- Position sets the picture: chest leads off the standard sites make false patterns. Wrong limb lead placement is a recognized source of error too.
Where It Fits
In suspected acute coronary syndrome, the 12-lead comes first. The ESC 2023 guideline says to perform and interpret it within 10 minutes of first medical contact. Under the direct activation model, the prehospital 12-lead goes to a PCI-capable center, so the cath lab can be activated before the patient arrives. Suspect right-ventricular or inferior involvement? Add V4R, V8 and V9 for a 15-lead. Add V7 as well and you have 16 leads. Right-sided leads go on when RV infarction is suspected with an inferior STEMI. Posterior leads help detect inferolateral infarction.
Indications & Contraindications
Indications
- Suspected acute coronary syndrome: chest pain or an equivalent symptom; obtain within 10 minutes of first medical contact
- Suspected posterior or lateral infarction: add V7 to V9 when ST depression is seen in V1 to V3 on the standard 12-lead, or when lateral or posterior ischemia is suspected
- Suspected right-ventricular infarction: add right-sided leads (V4R, and V1R to V6R as needed) to an inferior STEMI, most of all with hypotension or clear lungs. ST elevation in V4R that meets local STEMI criteria supports RV involvement. RV infarction depends on preload. Avoid nitrates and treat per protocol
- Non-diagnostic tracing with ongoing symptoms: repeat the 12-lead when symptoms persist or change, at the interval set by local protocol
- Other rhythm or conduction concerns: per local protocol
Absolute Contraindications
None. The 12-lead is noninvasive. When ACS is suspected, get it without delay.
Relative Contraindications & Cautions
- Cannot lie flat: record seated, with back support, and state the position on the tracing
- Movement, shivering or transport vibration: each one degrades the trace. Reduce movement and repeat
- Breast tissue: place chest electrodes on the breast tissue at the landmark, not under it
Scope & Team Roles
| Provider Level | Typical Role | Notes |
|---|---|---|
| EMT | Performs (protocol/credentialing required) | Acquisition under local protocol. Whether EMT scope includes acquisition or interpretation is state-defined; confirm locally. |
| AEMT | Performs (protocol/credentialing required) | Per local protocol and credentialing. |
| Paramedic | Performs | Acquires, checks for reversal and artifact, and transmits when the system uses teletransmission. |
| RN (ED/ICU) | Performs | Repeats tracings after repositioning and documents the lead system. |
| Critical Care Transport (CFRN / FP-C / CCP-C) | Performs | Repeats after moves and checks the tracing in transport conditions. |
| Physician / APP | Performs | Reviews and interprets; decides on transmission and repeat. |
Team Roles During the Procedure
- Operator: places the electrodes and checks each landmark
- Patient: holds still and stays supine or seated as needed
- Reviewer: checks calibration, limb polarity and R-wave progression before the tracing leaves the scene
- Recorder or transmitter: labels patient identity and time, notes non-standard positions, and sends or prints the tracing
Anatomy & Landmarks
| Site | Best For | Landmark | Placement | Avoid If |
|---|---|---|---|---|
| Limb electrodes | Every 12-lead | Wrists and ankles | RA, LA, LL, RL or N as labelled | Limb access limited: proximal upper arm or thigh, or lower torso, placed symmetrically |
| V1 and V2 | Septal and anterior wall | 4th intercostal space, right and left sternal border | On the landmark, not one space higher | — |
| V3 to V6 | Anterior and lateral wall | V4 at 5th space, midclavicular line; V5 and V6 level with V4 | Women: on breast tissue, not under it | — |
| V7 to V9 | Posterior or lateral infarction | Level with V4: posterior axillary, midscapular and left paraspinal lines | Back exposed | Patient cannot be turned or lifted safely |
| V4R, V1R to V6R | Right-ventricular infarction | Mirror image of V1 to V6 on the right chest | V4R at 5th space, right midclavicular line | — |
Limb Electrodes
- Place the four limb electrodes at the wrists and ankles: as usual, unless limb access is limited.
- Match each electrode to its label: colour sets differ by convention. Check the label on the cable, not the colour alone.
- If access is limited: use symmetric proximal sites on the upper arms and thighs, or the lower torso, kept well away from the chest leads.
- Document any relocation: torso-based limb leads can shift the frontal-plane axis and the ST level. Use the same configuration for serial tracings.
Chest Leads V1 to V6
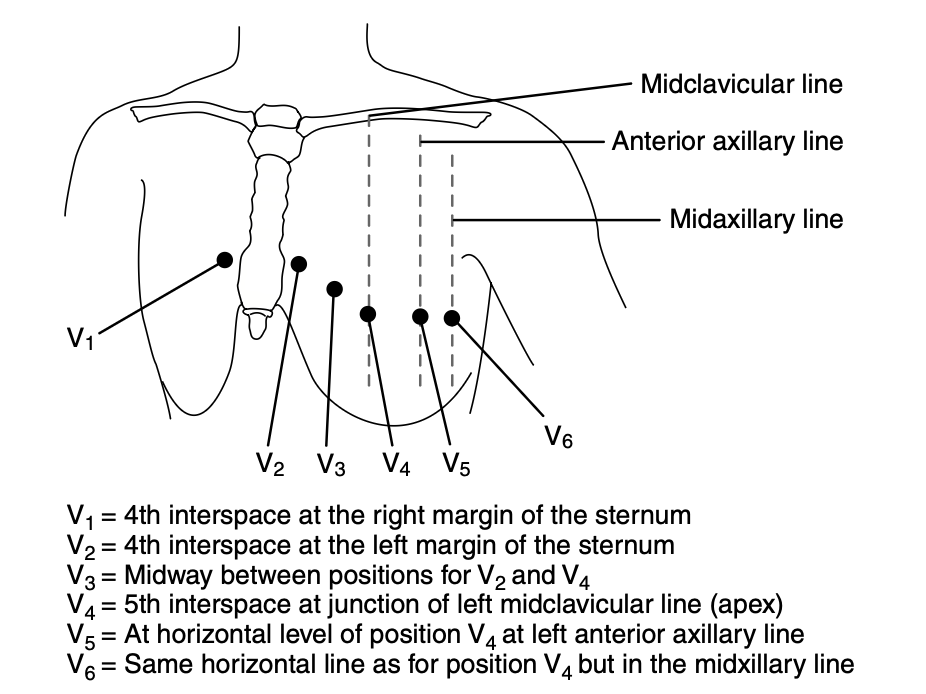
- Find the 4th intercostal space: palpate and confirm with the sternal angle; place V1 at the right sternal border and V2 at the left.
- Find the 5th intercostal space at the midclavicular line: place V4 here.
- Place V3 midway between V2 and V4, then V5 at the anterior axillary line and V6 at the midaxillary line, both level with V4.
- Record the positions used: if a landmark was uncertain, say so on the tracing.
Pediatric
These positions are adult landmarks. For children, the device's pediatric setup and your local protocol set the chest lead positions, the electrode size and any right-sided or high-chest leads.
Posterior Leads V7 to V9
- Keep V1 to V6 in standard positions: the anterior leads do not change.
- Place V7 at the left posterior axillary line, level with V4.
- Place V8 at the left midscapular line, level with V4, and V9 at the left paraspinal line, level with V4.
Right-Sided Leads (V4R and V1R to V6R)
- Mirror the standard sites on the right chest: V1R at the left sternal border in the 4th space, V2R at the right sternal border in the 4th space.
- Place V4R at the 5th intercostal space, right midclavicular line: the mirror image of V4. V3R to V6R follow along the right side, with V6R at the right midaxillary line.
Equipment & Preparation
Equipment
| Item | Size / Spec | Notes |
|---|---|---|
| 12-lead ECG machine | 25 mm/s, 10 mm/mV | Check the settings and the diagnostic filter setting before each recording |
| Limb electrodes | Four: RA, LA, LL, RL or N | Matched by label; colours differ by convention |
| Chest electrodes | Six: V1 to V6 | Adhesive; poor electrode contact degrades the tracing |
| Transmission or printer | — | Patient identity, time and lead-system note on the tracing |
Sizing
Adults get the standard sites above. For children, the device's pediatric setup and your local protocol decide the electrode size.
Patient Positioning & Preparation
- Standard: supine, with the chest and both wrists and ankles exposed
- Cannot lie flat: seated upright with back support and feet on the floor, to minimize motion artifact
- Skin: clean, dry skin gives better contact. Clip chest hair rather than shaving it. Poor contact is a recognized cause of a poor tracing
Pre-Procedure Checklist
- Identity and time on the record
- Machine on 25 mm/s and 10 mm/mV
- Supine, or seated with back support, position noted
- Skin clean, every electrode firmly stuck down
- Limbs at wrists and ankles, or proximal sites if access is limited
- V1 and V2 on the 4th space, V4 on the 5th, midclavicular line
- Women: chest electrodes on the breast tissue, not under it
- Posterior or right-sided leads ready if suspected: V7 to V9, V4R
- Patient told to hold still for the recording
Step-by-Step Procedure
Phase 1: Prepare
- Identify the patient and start the record: confirm name, time and the position (supine or seated) before the first lead.
- Expose the chest and limbs: clean the skin so the electrodes adhere.
- Find the landmarks before placing chest electrodes: locate the 4th and 5th intercostal spaces by palpation.
Phase 2: Perform
- Place the limb electrodes: at the wrists and ankles, checking each one against its label.
- Place V1 and V2: at the 4th intercostal space, right and left sternal border.
- Place V4: at the 5th intercostal space, left midclavicular line.
- Place V3, V5 and V6: V3 midway between V2 and V4; V5 and V6 level with V4 at the anterior axillary and midaxillary lines.
- For women: place V3 to V6 on the breast tissue at the landmark, not under the breast.
- Start the recording: ask the patient to stay still and to breathe normally.
Phase 3: Confirm & Transmit
- Check the tracing against the quality criteria: calibration, stable baseline, no interference, correct lead polarity, and R-wave progression from V2 to V4.
- If a limb lead is fully inverted or flat, or chest R-wave progression is disrupted: suspect misplacement, reposition and repeat.
- Label, transmit or print: include the lead system and any non-standard positions. For suspected STEMI, pre-notify the receiving center if your system uses pre-notification.
Alternative Technique: Posterior and Right-Sided Leads (15- or 16-Lead)
- Record the standard 12-lead first, so the standard tracing is kept.
- Add V7 to V9 at the posterior axillary, midscapular and left paraspinal lines, level with V4, when lateral or posterior infarction is suspected.
- Add V4R at the 5th space, right midclavicular line, when right-ventricular involvement is suspected with an inferior STEMI.
- Label the tracing: note the added leads so they are not read as standard leads.
Confirmation & Monitoring
Primary Confirmation
The one objective test is the quality check on the tracing. Look for the right patient label, 25 mm/s and 10 mm/mV on the record, a stable isoelectric baseline, no interference, correct lead polarity and smooth R-wave progression from V2 to V4.
Secondary Confirmation
- Limb leads: no lead with complete inversion of P, QRS and T, and no flat line
- Limb lead P waves: upright in I and II, negative in aVR, as described on the Cardiac Axis page
- Chest leads: R-wave amplitude rises from V1 to V4 without a disrupted step
| Finding | Success | Failure / Malposition |
|---|---|---|
| Limb lead polarity | No limb lead fully inverted or flat | Lead III fully inverted, with P amplitude in I greater than II and aVL and aVF exchanged: LA and LL swapped. Lead I and aVL inverted with aVR positive: RA and LA swapped. A small negative lead III alone is not specific |
| Chest R-wave progression | Smooth increase from V2 to V4 | Disrupted step: adjacent chest leads swapped or misplaced |
| V1 and V2 position | ST segment and QRS appropriate for V1 and V2 at the 4th space | ST elevation, Brugada-type or rSR′ pattern: electrodes at the 2nd or 3rd space |
| Calibration and baseline | 25 mm/s, 10 mm/mV, stable baseline | Wrong speed or gain; wandering baseline or tremor |
Ongoing Monitoring
- Repeat the 12-lead after any repositioning or suspected misplacement
- Repeat per local protocol when the clinical picture changes
- Keep the lead system consistent between serial tracings
Troubleshooting
| Problem | Likely Cause | Fix |
|---|---|---|
| Lead III fully inverted (P, QRS and T negative) | LA and LL swapped (P larger in I than II; aVL and aVF exchanged) | Check the limb cable labels against the limbs; reposition and repeat |
| Lead I and aVL inverted (P, QRS and T negative) | RA and LA swapped (aVR positive) | Reposition the two arm electrodes and repeat |
| Lead II fully inverted, with leads I and III showing each other's inverted complexes | RA and LL swapped | Check the RA and LL cables against their limbs; reposition and repeat |
| Lead I inverted with normal R-wave progression across V1 to V6 | RA and LA swapped (precordial leads unaffected) | Reposition the two arm electrodes and repeat |
| Lead I inverted with poor R-wave progression across V1 to V6 | Dextrocardia (reversed chest leads), with or without limb reversal | Compare with prior tracings and history; if dextrocardia is confirmed, label the right-sided chest set rather than reading standard sites |
| Multiple limb leads with mixed or unfamiliar complexes | Complex misplacement of several limb leads | Reposition all four limb electrodes against their labels and repeat |
| Flat line in one limb lead | Loose or dry limb electrode, or disconnected limb lead | Reattach or replace the electrode, check the cable, and repeat |
| Noise or interference across many leads | Loose, dry or disconnected neutral (RL) electrode | Reattach or replace the RL electrode, check its cable, and repeat |
| Disrupted R-wave progression | Adjacent chest leads swapped | Move each lead to its landmark; repeat |
| ST elevation, Brugada-type or rSR′ pattern in V1 and V2 | Electrodes at the 2nd or 3rd intercostal space | Move to the 4th space; repeat and compare with a prior tracing |
| Wandering baseline, tremor or interference | Movement, shivering, transport vibration or poor contact | Reduce movement, reattach electrodes and repeat |
| Low chest-lead voltage | Electrodes under breast tissue or too low; larger body habitus | Place on breast tissue at the landmark; document the position; compare with a prior tracing |
| Cannot lie flat | Dyspnea, pain, orthopnea or recent surgery | Record seated with back support; note the position on the tracing |
Complications
| Complication | Recognition | Prevention | Management |
|---|---|---|---|
| Immediate: missed STEMI | Tracing reads normal, or changes fall in an unexpected territory | Check landmarks and limb labels before recording | Repeat with corrected leads; do not withhold care while repeating |
| Immediate: treatment for a false pattern | Pattern mimics inferior MI or Brugada and does not match the clinical picture | Suspect reversal when the pattern is discordant | Reposition and repeat promptly, as the tracing must be retaken after correction |
| Delayed: diagnosis delay | Repeat recordings made late, after the first tracing was not checked | Review the tracing on the scene before transmitting | Repeat at once; transmit the corrected tracing |
| Rare: amplitude misread | Low voltage read as disease in women or in obese patients | Place chest leads on breast tissue at the landmark | Document the position; compare with a prior tracing |
Special Populations
Pediatrics
- Positions and sizes: this page is written for adults. The device's pediatric setup and your local protocol set the chest lead positions, including any V3R or V4R use in children
- Age-based normal values: R-wave amplitudes in the left precordial leads climb from infancy through early childhood. PR and QRS duration lengthen as the child grows. Use a pediatric reference
- Technical factors: electrode placement, filtering, sampling rate and calibration all move measured voltages. Keep them consistent between serial tracings
See also for children: Equipment Sizing, Pediatric Vital Signs by Age.
Women with Breast Tissue
- Breast tissue can lower chest-lead amplitude. Misplacement is the bigger risk
- Place V3 to V6 on the breast tissue at the landmark, not under it
Obesity
- Finding the midclavicular line and V4 is less certain in obese patients
- Palpate the landmark, document the position used, and use the same site on serial tracings
Physiologically Difficult
- Seated acquisition: the standard precordial sites still apply. Seated posture may modestly shift heart rate and PR, QRS, QT and T-wave morphology
- State the position: label seated tracings and compare them with supine tracings with care
- Amputee: place limb electrodes on the torso, symmetrically, and label the configuration
- Tremor (for example Parkinson disease): record in the steadiest window, reduce movement and label any residual artifact
Pregnancy
- Placement: the same landmarks apply. Do not move electrodes for pregnancy
- Physiologic changes: pregnancy can bring an axis shift and ST-T changes. Compare with a prior tracing and note the gestation
Dextrocardia
- Recognize the pattern: an inverted lead I with poor R-wave progression suggests dextrocardia, with or without limb reversal. An inverted lead I with normal progression suggests an RA-LA swap
- Label the set: use right-sided chest leads (V1R to V6R) in suspected dextrocardia, and document the mirrored set on the tracing
Implanted Devices and Paced Rhythm
- Paced rhythm: a paced QRS changes the ST-T reading. Label pacing on the tracing and compare with a prior tracing
- Dressings or device pockets: move electrodes only as needed to avoid them, keep the landmark, and note any deviation
Post-Procedure Care & Transport
Immediate Aftercare
- Confirm the tracing is saved or transmitted before the patient is moved
- If any lead was moved after the first recording, record again
Ongoing Maintenance
- Keep electrodes adhered and leads untangled, and check them after each move
- Keep the same lead configuration on serial tracings
Transport Considerations
- Vehicle vibration, outdoor settings and suboptimal positions can all degrade a recording. Reconfirm the tracing after moves
- Torso-based limb leads can shift the axis and the ST level. Use the same configuration and note it
Document & Hand Off
- First medical contact time, and the tracing time against the 10-minute target
- Supine or seated, plus any non-standard lead positions
- Limb polarity and R-wave progression: checked or not, and any repositioning
- Artifact noted, and whether the tracing went out by transmission or print
- Posterior or right-sided leads added, and the reason
- Receiving center pre-notified, if it was
Clinical Pearls & Pitfalls
Pearls
- Landmarks beat estimates: count down to the 4th and 5th intercostal spaces with your fingers. The pad lands where it lands. The landmark does not move
- Read the limb leads first: a fully inverted or flat one points to reversal before it points to disease
- Limb reversals are the usual misplacement: you will hear RA-LA called the most common. One 2025 series found LA-LL most frequent, at 8 of 11 limb reversals. Check both
- Breast tissue is a placement issue: the tissue can lower chest-lead amplitude. Don't work around it. Put the electrode on the tissue, at the landmark
- Add the leads when suspected: inferior STEMI with suspected RV involvement? V4R plus V8 and V9 makes it a 15-lead tracing
- The machine read may miss it: the software does not reliably detect lead misplacement. Someone has to look at the tracing before it drives a decision
Common Pitfalls
- V1 and V2 placed high → move to the 4th space and repeat
- Reversed limb leads read as an axis or P-wave problem → check polarity and limb labels first
- Chest electrodes under the breast → place on the breast tissue at the landmark
- Normal-looking tracing in a patient with ACS symptoms → recheck placement before accepting it as normal
- Adult criteria on a child's tracing → use a pediatric reference
- Seated or non-standard tracing with no note → state the position and lead system on the tracing
Education & Skill Maintenance
Skill Maintenance
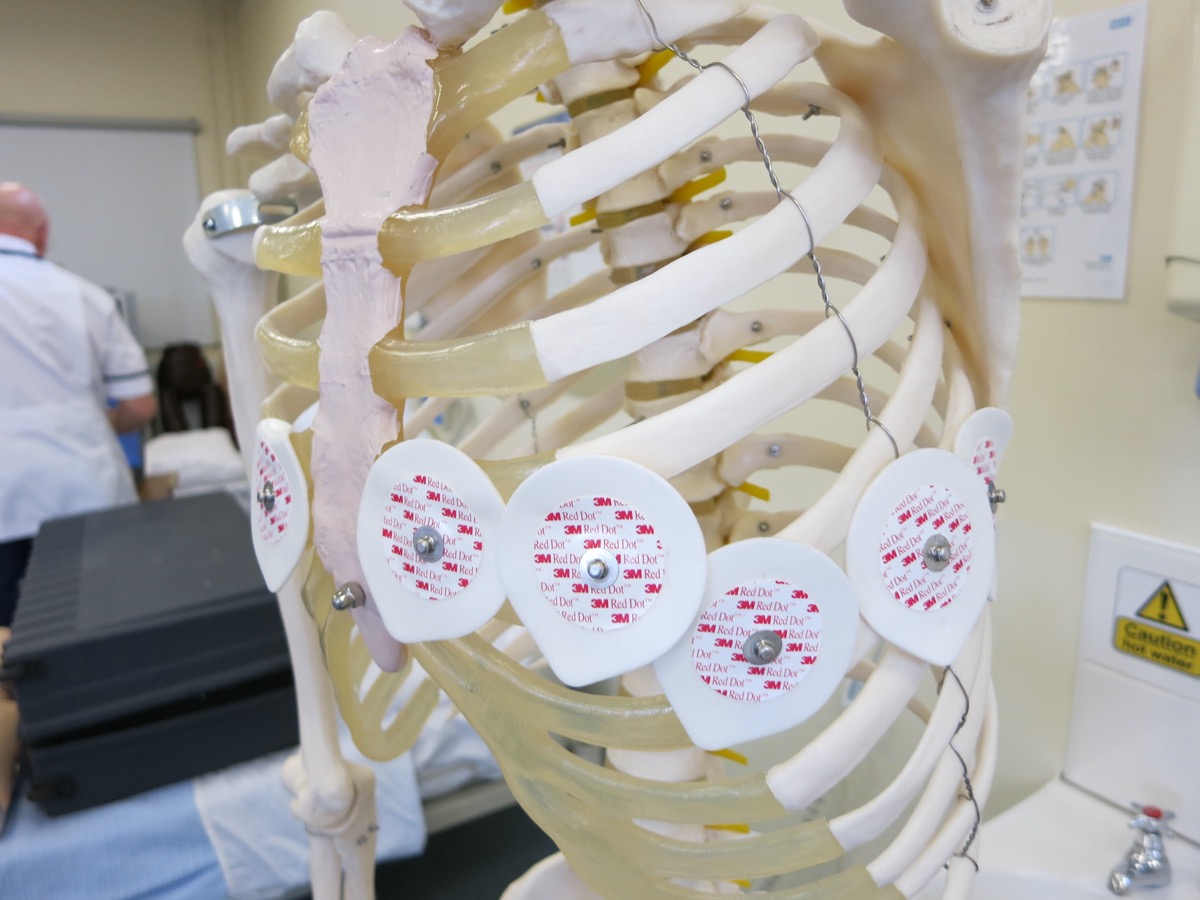
- Practice electrode placement on a torso model against a written landmark checklist
- Debrief each misplaced tracing: which lead, which error, which pattern
- Train pattern recognition for limb reversal and disrupted R-wave progression. Awareness of these errors is often lacking among junior doctors, nurses and paramedical staff, and a 2025 lead-reversal study reported that gap
- Review the Checklist and Troubleshooting table at each skills session
References
- Kligfield P, Gettes LS, Bailey JJ, et al. Recommendations for the standardization and interpretation of the electrocardiogram: part I: the electrocardiogram and its technology. A scientific statement from the American Heart Association, American College of Cardiology Foundation and Heart Rhythm Society. Circulation. 2007;115(10):1306–1324. https://doi.org/10.1161/circulationaha.106.180200
- Morales-Arteaga JL, Meghdadi A, Wu D, et al. Alternative lead ECG placements. Ann Noninvasive Electrocardiol. 2026;31(3):e70176. https://doi.org/10.1111/anec.70176
- Ramadurai S, Varadarajan V, Lasrado AA, et al. A study of the frequency of lead reversal at a tertiary care institution. Cureus. 2025;17(9):e92345. https://doi.org/10.7759/cureus.92345
- Rautaharju PM, Park L, Rautaharju FS, Crow R. A standardized procedure for locating and documenting ECG chest electrode positions: consideration of the effect of breast tissue on ECG amplitudes in women. J Electrocardiol. 1998;31(1):17–29. https://doi.org/10.1016/s0022-0736(98)90003-6
- Byrne RA, Rossello X, Coughlan JJ, et al. 2023 ESC Guidelines for the management of acute coronary syndromes. Eur Heart J. 2023;44(38):3720–3826. https://doi.org/10.1093/eurheartj/ehad191
- Tomczak E, Gawinski L, Matewski K, Kozlowski R. Prehospital 12-lead ECG teletransmission in acute coronary syndromes: diagnostic, prognostic, and systems-of-care implications. J Clin Med. 2026;15(15):5840. https://doi.org/10.3390/jcm15155840
- Miliaraki M, Germanakis I. Pediatric electrocardiogram in preparticipation screening: narrative review of normal values in key features. Children (Basel). 2026;13(2):209. https://doi.org/10.3390/children13020209
- Rao SV, O'Donoghue ML, Ruel M, et al. 2025 ACC/AHA/ACEP/NAEMSP/SCAI guideline for the management of patients with acute coronary syndromes. Circulation. 2025;151(13). https://doi.org/10.1161/CIR.0000000000001309
Medical Disclaimer
- For Educational Purposes Only: This content is intended for educational reference and should not be used for clinical decision-making.
- Not a Substitute for Professional Judgment: Always consult your local protocols, institutional guidelines, and supervising physicians.
- Verify Before Acting: Users are responsible for verifying information through authoritative sources before any clinical application.