

Bedside Snapshot
- Indications
- Suspected tension: one-sided absent breath sounds with hypotension or hypoxemia
- Ventilated patient: rising pressures with falling SpO₂ or BP
- Traumatic arrest with torso trauma: TCCC directs needle decompression on both sides; civilian protocols may differ
- Contraindications / Abort
- No absolute contraindication when tension is present
- Pneumothorax without tension signs: chest tube, not needle
- Blood on withdrawal: plan chest tube
- Critical Steps
- Choose 2nd ICS MCL or 4th/5th ICS AAL
- Insert perpendicular over the top of the rib; at the lateral site stop once air is released (do not hub the full unit)
- Hold 5–10 s, remove needle, leave catheter
- Two needle decompressions for failure to respond (TCCC), then the next step
- Confirm & Monitor
- Air release, BP and SpO₂ improve
- Ventilator pressures fall; breath sounds return
- Relapse after an initial response is a new event: re-decompress at once, then chest tube
Key Numbers
Needle decompression converts suspected tension pneumothorax into a temporary air exit. Do it as soon as tension physiology is recognized; the site and catheter length below are the protocol values to check.
| Parameter | Value |
|---|---|
| Site | Adult: 2nd ICS at the midclavicular line (anterior), or 4th/5th ICS at the anterior axillary line (lateral) Peds: protocol sets site and size; no validated pediatric length on this page |
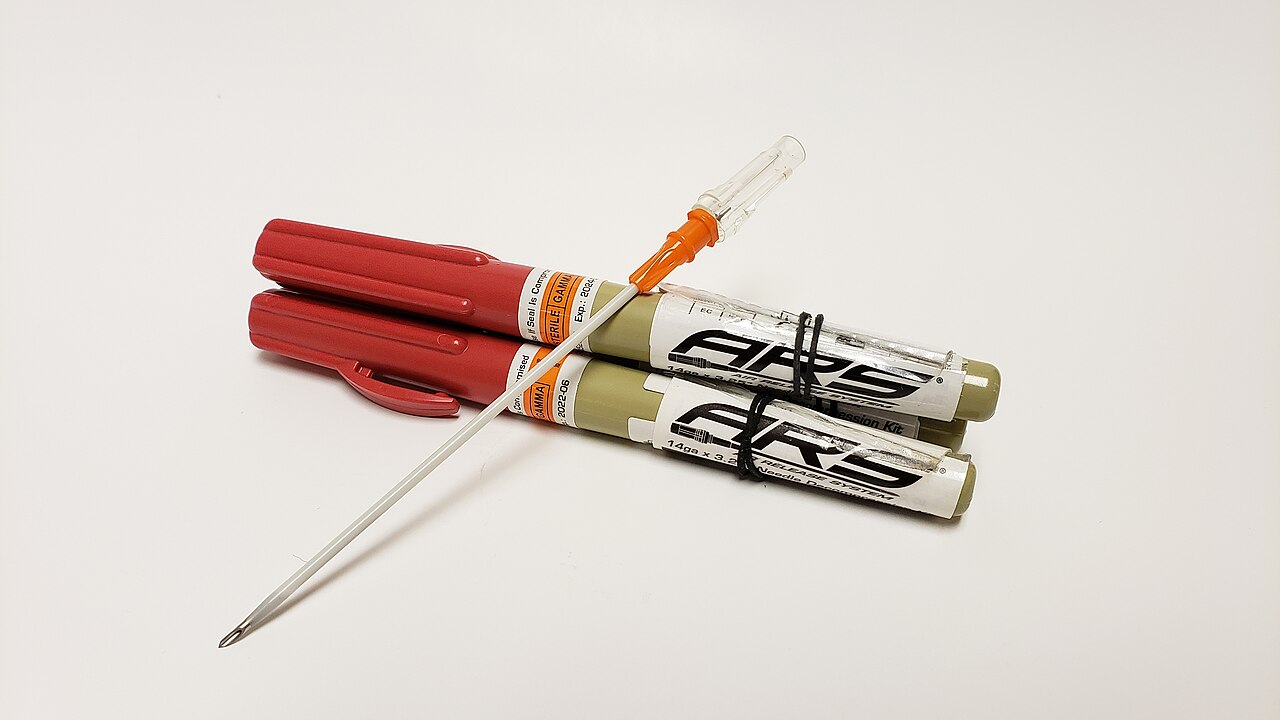
| Needle-catheter | Adult: 14 gauge or 10 gauge, 3.25 in (83 mm) TCCC unit Peds: length set by measured chest wall, not an adult default |
| Catheter length (adult) | One retrospective single-centre study found an 8 cm angiocatheter more effective than the 5 cm length ATLS listed at the time. TCCC specifies the 83 mm unit. |
| Insertion | Perpendicular to the chest wall, over the top of the rib. TCCC text says to the hub; at the lateral site the page advises stopping once air is released (see warning under Anatomy) |
| Hold | 5–10 seconds after insertion (air release or full insertion at the 2nd ICS MCL), then remove the needle and leave the catheter |
| Attempts | No more than two needle decompressions for failure to respond, then move to the Circulation step (TCCC 17-02). Finger thoracostomy or chest tube are added only in refractory shock and for trained providers. Recurrence after a response is a new event. |
| Confirm | Air release, then improved BP, SpO₂ and ventilation pressures; breath sounds on the treated side |
| Definitive step | Chest tube per protocol as soon as the patient can be moved; the needle is temporary |
Overview & Principles
Needle decompression is a pleural puncture done in an emergency. Its job is to let trapped air out. Finger thoracostomy does the same job by opening the chest with blunt dissection instead of a needle. You reach for it when the needle fails or when a chest tube is not possible yet.
How It Works
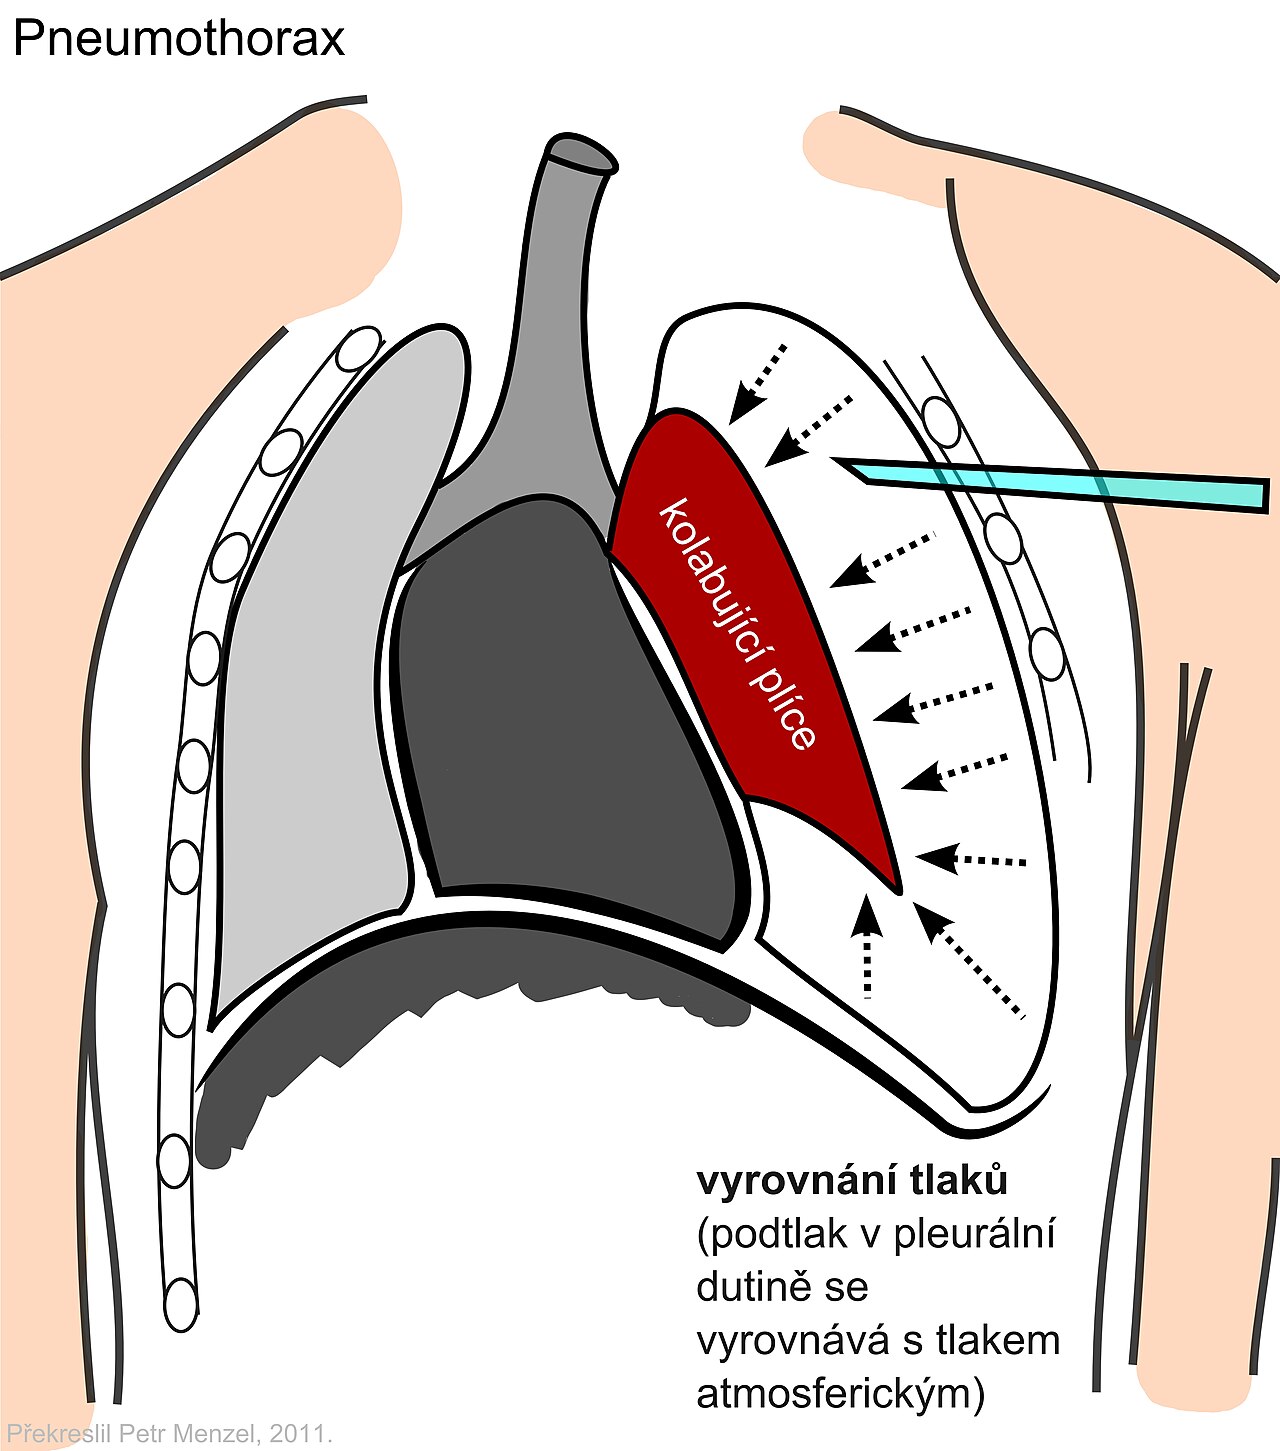
- Air trapped under pressure: air gets into the pleural space and has no way out. Pressure climbs, and the lung collapses.
- Mediastinal shift: the pressure pushes the heart and great vessels to the other side. Venous return drops.
- Decompression: a catheter through the chest wall lets the air out to atmosphere. Pressure falls, and venous return comes back.
- Temporary effect: the catheter can kink, clot or fall out. Air can build back up. That is why a chest tube must follow.
Where It Fits
Tension pneumothorax is a clinical diagnosis. Suspect it in a patient with hypotension, hypoxemia or cardiac arrest? Decompress before imaging. Don't wait for a film. The needle is the first step. If needle attempts fail, TCCC allows finger thoracostomy or chest tube only in refractory shock, and only for trained providers. Civilian protocols may use finger thoracostomy sooner. Tube thoracostomy is the definitive step. In traumatic cardiac arrest with torso trauma, TCCC directs needle decompression on both sides of the chest (see Indications).
Indications & Contraindications
Indications
- Suspected tension pneumothorax: one-sided absent or reduced breath sounds with hypotension, hypoxemia or obstructed ventilation
- Ventilated patient: rising airway pressures, falling SpO₂ or BP, and a one-sided exam. Decompress without delay. Check auto-PEEP or circuit problems only as a quick differential.
- Traumatic cardiac arrest with torso trauma: TCCC (combat guidance) directs needle decompression on both sides of the chest before the patient reaches a treatment facility. Civilian and ventilated-patient protocols may use finger or simple thoracostomy instead. Follow local protocol.
Absolute Contraindications
None, once tension physiology is clinically present. Don't delay decompression for imaging, for vital signs that look stable, or for a second provider to agree.
Relative Contraindications & Cautions
- No tension signs: a pneumothorax without hypotension, hypoxemia or rising pressures gets monitoring and a chest tube per protocol. It does not get a needle.
- Blood on needle withdrawal: possible hemothorax or vessel injury. Plan a chest tube.
- Unclear site landmarks: re-palpate, or move to the other site. Don't insert through an unknown plane.
Consider an Alternative
Reach for finger thoracostomy when a needle has failed or the catheter is too short for the chest wall. Tube thoracostomy comes once the patient is stable enough to move and the team has a drainage kit.
Scope & Team Roles
| Provider Level | Typical Role | Notes |
|---|---|---|
| EMT | Not in scope | Recognize tension signs, call for help, prepare equipment |
| AEMT | Not in scope | Oxygen, ventilation and monitoring until the paramedic arrives |
| Paramedic | Performs (protocol/credentialing required) | Verify against the National EMS Scope of Practice Model and state rules |
| RN (ED/ICU) | Assists | Equipment, monitoring and documentation; the RN may perform only where credentialed |
| Critical Care Transport (CFRN / CTRN / FP-C / CCP-C) | Performs (protocol/credentialing required) | Agency-specific; common in transport protocols for tension physiology |
| Physician / APP | Performs | Operator for most hospital cases; the decompression step may be done by any credentialed team member |
Team Roles During the Procedure
- Operator: confirms the side and site, decompresses and secures the catheter
- Airway/oxygen manager: keeps the ventilation and oxygen running and reports pressure changes
- Monitor/recorder: reads BP, SpO₂ and time, and calls each change
- Equipment support: hands over the needle, the second site option and the chest-tube kit in order
Pre-Procedure Assessment
Recognition, Including Ventilated Patients
| Finding | Typical Presentation | Notes |
|---|---|---|
| One-sided breath sounds | Absent or reduced on the affected side | Compare both sides; noise and a tilted patient make this harder |
| Hemodynamics | Hypotension, tachycardia, poor perfusion | Distended neck veins may be absent with hypovolemia |
| Oxygenation | Falling SpO₂ despite oxygen | Trend it; a falling value is an early sign |
| Ventilated patient | Rising peak pressure, falling EtCO₂ or SpO₂, hypotension after positive pressure or PEEP is raised | A quick check for auto-PEEP or circuit problems only; do not let it delay decompression. A one-sided exam guides the side |
| Tracheal deviation | Shift away from the affected side | A late sign; do not wait for it |
Anatomy & Landmarks
TCCC accepts two sites. One is the anterior 2nd intercostal space at the midclavicular line. The other is the lateral 4th or 5th intercostal space at the anterior axillary line. Both are used in practice. Observational data favor different sites for different body habitus.
| Site | Best For | Landmark | Angle/Depth | Avoid If |
|---|---|---|---|---|
| 2nd ICS, midclavicular (anterior) | Overweight or obese patients in the 2021 multicenter study | Second rib at the midclavicular line | Perpendicular; to the hub of the chosen catheter | Landmarks not palpable; use the other site |
| 4th/5th ICS, anterior axillary (lateral) | Lower failure in the 2016 meta-analysis of observational data | Nipple level, anterior axillary line | Perpendicular; do not hub a long catheter in a small or young chest without a CT-informed check | Pericardial distance is a concern (see warning) |
2nd ICS, Midclavicular (Anterior)
- Find the second rib: follow the rib from the sternal angle, then count to the second intercostal space
- Mark the midclavicular line: from the midpoint of the clavicle, straight down
- Insert over the top of the third rib: perpendicular, staying above the rib
- Advance: to the hub of the chosen catheter, per protocol; hold 5–10 seconds, then remove the needle and leave the catheter
Pediatric
For children, the protocol sets the site and depth. See Special Populations.
4th/5th ICS, Anterior Axillary (Lateral)
- Abduct the arm if possible: this opens the lateral chest wall
- Find the nipple level: locate the 4th or 5th intercostal space at the anterior axillary line
- Insert over the top of the rib: perpendicular, not angled toward the heart
- Advance only until air is released or a give is felt, then stop: TCCC says to the hub, yet the 2023 CT study found the heart within reach of a full 83 mm unit here. Don't hub the full unit at this site unless the service protocol says otherwise. Hold 5–10 seconds, then remove the needle.
Pediatric
Follow the local pediatric protocol. A smaller child may need a shorter catheter or a different site.
Equipment & Preparation
Equipment
| Item | Size / Spec | Notes |
|---|---|---|
| Needle-catheter | 14 gauge or 10 gauge, 3.25 in (83 mm) | TCCC unit (10 gauge added in TCCC 17-02); see Figure 2 |
| Longer angiocatheter | 8 cm or longer | Based on one retrospective single-centre study ; evidence is limited. Keep one on hand only if the service stocks it |
| Finger thoracostomy kit | Scalpel, blunt dissection forceps, gloves | Backup when the needle fails; per protocol |
| Vented chest seal | Vented first in current TCCC text (as of the 2021 text found; verify); unvented as fallback | Relieves air from an open wound; the evidence for vented over unvented is model-based; see Pitfalls |
| Chest tube kit | Per protocol | Definitive drainage once the patient can be moved |
| Monitoring | SpO₂, BP, EtCO₂, ventilator pressure display | Required to judge response |
Sizing
| Measure | Value | Source |
|---|---|---|
| Chest wall, 2nd ICS MCL | Median 26 mm (range 9–52 mm) by ultrasound | 2021 multicenter, 392 adults |
| Chest wall, 4th/5th ICS AAL | Median 26 mm (range 10–78 mm) by ultrasound | 2021 multicenter, 392 adults |
| Pooled mean, 2nd ICS MCL | 42.8 mm (pooled mean) | 2016 meta-analysis |
| Length needed for 95% success | 6.44 cm in the pooled dataset | 2015 meta-analysis |
Patient Positioning & Preparation
Bare the chest, and name the side from breath sounds and the exam. Lay the patient flat or semi-recumbent. On a lateral site, keep the arm out and up if the patient allows. Oxygen keeps running. A ventilated patient stays on the circuit unless pressure is climbing.
Pre-Procedure Checklist
- Side identified and documented
- Both sites known; landmarks palpated
- Needle-catheter (83 mm TCCC unit) and any longer catheter the service stocks, with backup
- Finger thoracostomy kit open and ready
- Vented chest seal available if there is an open wound
- Chest tube kit available, per protocol
- SpO₂, BP and EtCO₂ monitoring running
- Team roles assigned: operator, airway, monitor, equipment
Step-by-Step Procedure
Phase 1: Prepare
- Call tension early: state the suspected side and the reason, and assign the team roles
- Choose the site: the 2nd ICS MCL or the 4th/5th ICS AAL, per protocol and the patient's habitus
Phase 2: Perform
- Clean the site: disinfect the skin over the chosen space
- Palpate and mark: confirm the rib, then the space below it
- Insert perpendicular: over the top of the rib, at 90 degrees to the chest wall
- Advance: to the hub at the 2nd ICS MCL, per protocol; at the 5th ICS AAL advance only until air is released or a give is felt (see Anatomy)
- Hold and withdraw: hold 5–10 seconds, remove the needle, and leave the catheter
- Secure and listen: tape the hub and listen for air release
Phase 3: Confirm & Secure
- Reassess: BP, SpO₂, breath sounds, and ventilation pressures within a minute
- Plan the next step: if no response after two needle decompressions, move to the Circulation step (TCCC); finger thoracostomy or chest tube only per protocol and in refractory shock
Alternative Technique: Finger Thoracostomy
You reach for it when a needle has failed or tension comes back. Under TCCC guidance, that means after two needle attempts, in refractory shock, by a trained and authorized provider. It is usually done on intubated, positive-pressure ventilated patients. Open the chest in a spontaneously breathing patient and you can create an open pneumothorax, so have a plan for an immediate tube or a seal. The sources behind this page describe the technique only in limited detail. Follow the protocol and your training.
- Mark the site: the safe triangle at the 5th intercostal space, anterior to the mid-axillary line and lateral to the pectoralis major edge, above the rib. Analgesia first if the patient is awake
- Incise: make a skin incision of about 3–4 cm, per protocol, and divide to the intercostal muscles over the top of the rib
- Blunt dissection: open the pleura with a curved forceps or finger, stay above the rib
- Sweep and confirm: insert a gloved finger into the space and sweep it to confirm lung freedom and check for adhesions; confirm by air rush, then keep the track open. Do not use a trocar
Confirmation & Monitoring
Primary Confirmation
Look for a physiologic response. BP and SpO₂ come up, ventilation pressure comes down, and breath sounds return on the treated side. A brief hiss is not enough on its own.
Secondary Confirmation
- Breath sounds equal bilaterally on re-exam
- Waveform EtCO₂ rising or stable in a ventilated patient
- Chest rise on the treated side in a ventilated patient
- Catheter hub stays secure and does not kink
| Finding | Success | Failure / Malposition |
|---|---|---|
| Air release | Hiss or air flow, then falling pressure | No air; catheter may be outside the pleura or kinked |
| BP and SpO₂ | Improve within a minute | Unchanged: re-check the side, the site and the catheter |
| Ventilator pressure | Peak pressure falls | Stays high: second decompression (TCCC limit: two), then the Circulation step |
| Blood | None or small | Brisk blood: hemothorax or vessel; plan chest tube |
Ongoing Monitoring
- BP, SpO₂ and breath sounds every 5 minutes until transfer (local suggestion; not a TCCC figure)
- Ventilator pressures continuously in a ventilated patient
- Catheter position and dressing at every move
- Relapse after an initial response: re-decompress at once, then chest tube
Troubleshooting
| Problem | Likely Cause | Fix |
|---|---|---|
| No air release | Catheter not in the pleura, or kinked | Re-check the site; re-insert; consider the other site |
| No improvement | Catheter too short for the chest wall, or wrong space | Second decompression at the alternate site (TCCC limit: two in total); then the Circulation step; finger thoracostomy or chest tube only in refractory shock per protocol |
| Catheter kinks or falls out | Movement, poor taping | Secure the hub; re-decompress if the patient deteriorates |
| Blood on withdrawal | Hemothorax or vessel injury | Plan chest tube; monitor for bleeding |
| Relapse later | Catheter dislodged, kinked or clotted; ongoing air leak | Re-decompress (a new event); then chest tube per protocol |
| Pressure rises again on the ventilator | Ongoing leak or the other side | Check both sides; re-decompress the affected side |
If It Still Fails
- Re-check the side and the exam: confirm the diagnosis
- Second decompression: at the alternate site, within the two-attempt limit
- Finger thoracostomy: per protocol and training; in TCCC guidance only in refractory shock
- Chest tube: definitive drainage once it is safe to move
Complications
| Complication | Recognition | Prevention | Management |
|---|---|---|---|
| Immediate: cardiac or pericardial injury | Sudden deterioration or arrest after decompression at the lateral site | Insert perpendicular, never angled toward the heart; at the lateral site stop once air is released or a give is felt, and do not hub the full 83 mm unit unless the service protocol says otherwise; respect chest-wall thickness | Stop; remove the catheter; resuscitate per protocol; surgical team |
| Immediate: hemothorax or lung injury | Blood on withdrawal; falling SpO₂ | Stay over the top of the rib; keep the needle perpendicular; keep the insertion at the chosen site, not medial | Chest tube per protocol |
| Immediate: intercostal vessel, nerve or great-vessel injury | Blood on withdrawal; falling BP; pain or nerve signs if conscious | Over the top of the rib; perpendicular; avoid a medial or angled insertion (internal mammary and great vessels lie medially) | Stop; chest tube per protocol; surgical team |
| Immediate: catheter in the wrong space | No air release; no improvement | Confirm landmarks and the pleural space | Re-insert or change site |
| Delayed: relapse | Pressure rises again; BP falls | Secure the catheter; plan chest tube early | Re-decompress; chest tube |
| Rare: infection or subcutaneous air | Local swelling, crepitus | Sterile technique where the time allows | Per protocol; follow with chest tube |
Special Populations
Pediatrics
- Catheter length: set it from the child's chest wall, using ultrasound or CT data where available. Don't use an adult default. An 8 cm adult catheter may overshoot in a small child.
- Site: the protocol sets the site and size for children. The sites above are adult values.
- Obstructive shock: needle decompression comes first, then a chest tube per protocol. In an unstable child, don't wait for a chest X-ray.
- Site and size: the same two sites are described for adults. This page gives no validated pediatric catheter length or gauge. Use the local pediatric protocol.
For pediatric sizes and doses, go to equipment sizing, pediatric shock, or pediatric cardiac arrest.
Obesity
- Chest wall: in overweight and obese adults, it is thicker at the lateral site than at the 2nd ICS MCL.
- Catheter: you may need a longer one. The MCL site may be the better choice.
Physiologically Difficult
- Shock: decompress without delay. The team runs its other steps alongside.
- Ventilated patient: a one-sided exam with falling BP or SpO₂ means decompress without delay. Disconnect and hand-bag only as a quick differential for auto-PEEP or circuit problems. That check must never delay decompression when tension is evident.
Post-Procedure Care & Transport
Immediate Aftercare
- Reassess: BP, SpO₂, breath sounds and ventilation pressures after every change
- Secure: tape the catheter and mark the site
- Plan drainage: chest tube per protocol as soon as possible, ideally before flight when feasible
Ongoing Maintenance
- Check the catheter hub and dressing at every move
- Watch for relapse, falling SpO₂ and rising pressures
- Re-decompress at once if the patient deteriorates
Transport Considerations
- Relapse: a catheter can kink or fall out during loading and moving
- Altitude: air expands on ascent (Boyle's law), so reassess before and during flight and at each altitude change; a decompressed pneumothorax may re-enlarge or tension may recur in flight. Prefer a chest tube before flight when feasible.
- Noise and vibration: rely on monitors and breath sounds, not on the sound of air
- Reassessment: after each move and every change in ventilator settings
Document & Hand Off
- Time of tension recognition and time of decompression
- Side, site, needle-catheter and catheter length used
- Attempts and the response after each
- Confirmation method and measured values
- Ventilator settings and pressures before and after
- Medications, fluids and blood given
- Complications and the patient's response
Clinical Pearls & Pitfalls
Pearls
- Decide early: tension is a bedside call. Don't wait for imaging.
- Length matters: one retrospective single-centre study found an 8 cm catheter more effective than the older 5 cm length. The TCCC unit is 83 mm.
- Two attempts: for failure to respond, TCCC caps needle decompressions at two, then moves you to Circulation. A recurrence after a response is a new event.
- Hold and remove: hold 5–10 seconds. Then the needle comes out, and the catheter stays.
- Needle is temporary: a chest tube has to follow.
Common Pitfalls
- Waiting for certainty: you don't need a perfect picture first. Decompress once tension physiology is present, then confirm.
- Judging by a hiss: a hiss is not proof. Confirm with BP, SpO₂ and pressures.
- Pushing past the planned depth: at the lateral site, don't hub the full unit. Never angle the needle toward the heart.
- Sealing an open wound: a sealed open wound can turn into tension under the seal. If tension develops under any seal, burp or lift the seal, then decompress if signs persist (TCCC text as found, verify current wording). The case for vented seals rests on a model study. That study compared three vented seals with each other, not vented with unvented. It is limited evidence.
Education & Skill Maintenance
Skill Maintenance
- Practice landmarks at both sites on a chest model at least every 6 months
- Run tension simulations in the ventilated patient, not only in the trauma bay
- Check decompression kits for catheter length and gauge at every shift
- Debrief each case: was tension recognized early enough, and was the site right
References
- Tactical Combat Casualty Care Committee. Management of suspected tension pneumothorax in Tactical Combat Casualty Care: TCCC Guidelines Change 17-02. J Spec Oper Med. 2018;18(2) (abstract-level summary; full text not read). https://jsomonline.org/?p=12233
- Azizi N, Ter Avest E, Hoek AE, et al. Optimal anatomical location for needle chest decompression for tension pneumothorax: a multicenter prospective cohort study. Injury. 2021;52(2):213-218. https://doi.org/10.1016/j.injury.2020.10.068
- Laan DV, Vu TD, Thiels CA, et al. Chest wall thickness and decompression failure: a systematic review and meta-analysis comparing anatomic locations in needle thoracostomy. Injury. 2016;47(4):797-804. https://doi.org/10.1016/j.injury.2015.11.045
- Thompson P, Ciaraglia A, Handspiker E, et al. Risk of harm in needle decompression for tension pneumothorax. J Spec Oper Med. 2023;23(2):9-12. https://doi.org/10.55460/ZU1D-3DL9
- Aho JM, Thiels CA, El Khatib MM, et al. Needle thoracostomy: clinical effectiveness is improved using a longer angiocatheter. J Trauma Acute Care Surg. 2016;80(2):272-277. https://doi.org/10.1097/TA.0000000000000889
- Clemency BM, Tanski CT, Rosenberg M, et al. Sufficient catheter length for pneumothorax needle decompression: a meta-analysis. Prehosp Disaster Med. 2015;30(3):249-253. https://doi.org/10.1017/S1049023X15004653
- Drinhaus H, Annecke T, Hinkelbein J. [Chest decompression in emergency medicine and intensive care]. Anaesthesist. 2016;65(10):768-775 (in German). https://doi.org/10.1007/s00101-016-0219-7
- Kotora JG, Henao J, Littlejohn LF, Kircher S. Vented chest seals for prevention of tension pneumothorax in a communicating pneumothorax. J Emerg Med. 2013;45(5):686-694. https://doi.org/10.1016/j.jemermed.2013.05.011
Medical Disclaimer
- For Educational Purposes Only: This content is intended for educational reference and should not be used for clinical decision-making.
- Not a Substitute for Professional Judgment: Always consult your local protocols, institutional guidelines, and supervising physicians.
- Verify Before Acting: Users are responsible for verifying information through authoritative sources before any clinical application.